Love this? Save it for later!
Share the inspiration with your friends
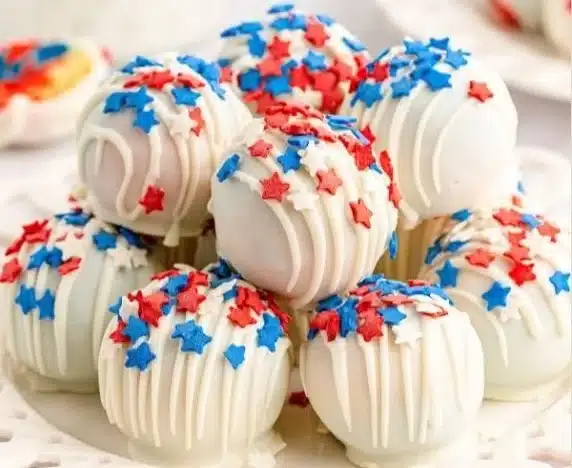
“Are you seriously making cake balls again?” my cousin joked over the phone, sounding half amused, half resigned. I had just wrapped up my third batch of these red, white, and blue cake balls for the summer barbecue, and honestly, I was hooked. The thing is, this recipe wasn’t planned. It started as a last-minute scramble when I realized the usual dessert wouldn’t cut it for our Independence Day celebration. I grabbed a boxed vanilla cake mix, some cream cheese, and a handful of sprinkles, thinking I’d throw something together quickly. But somewhere between mixing the batter and dipping those little spheres in vibrant coatings, the skepticism faded. These bite-sized festive treats turned out to be the hit of the party.
What surprised me most was how simple ingredients and a bit of creativity could spark a new tradition. The smell of vanilla cake mingling with sweet frosting, the pop of patriotic colors, and that satisfying pop of flavor with every bite made me realize this wasn’t just another dessert. It was a moment of comfort and celebration wrapped in a treat. I found myself making these red, white, and blue cake balls again and again that summer — perfect for bringing people together in the easiest, most fun way possible.
There’s something quietly joyful about having a platter of these cake balls ready to go, each one a little symbol of festivity and ease. They’re not just about the colors or the occasion; they’re about the little victories in the kitchen when you need something sweet, simple, and sincere. That’s why this recipe stuck around my kitchen—and why I think you’ll appreciate it too, whether you’re prepping for a big party or just craving a nostalgic, festive treat.
Why You’ll Love This Recipe
Honestly, these Perfect Red, White, and Blue Cake Balls are more than just eye candy—they’re a reliable crowd-pleaser that anyone can pull off with minimal fuss. I’ve tested this recipe several times, tweaking the frosting-to-cake ratio and dipping technique to get that ideal texture and flavor balance. Here’s why this recipe stands out:
- Quick & Easy: You can have these ready in under an hour, which is perfect when the party is right around the corner or when you’re juggling a million things.
- Simple Ingredients: No fancy trips to specialty stores—vanilla cake mix, cream cheese, and candy melts are staples you probably already have or can find easily.
- Perfect for Festive Occasions: Whether it’s the 4th of July, Memorial Day, or any red-white-and-blue themed event, these cake balls fit right in.
- Crowd-Pleaser: Kids and adults alike love them. The bite-sized portions make sharing effortless, and the flavors are universally appealing.
- Unbelievably Delicious: The moist, creamy inside contrasts beautifully with the crisp candy coating, creating a texture combo that’s honestly addictive.
What makes this recipe different? It’s all in the balance. The cake is moist but firm enough to roll easily, and the cream cheese frosting is just tangy enough to cut through the sweetness. Plus, I use a gentle melting technique for the candy coating that keeps the colors vibrant and smooth, avoiding that dreaded clumpy finish.
This isn’t just a dessert—it’s a little celebration in every bite, a recipe that’s as comforting as it is festive. For a sweet twist on summer parties, paired with a cool raspberry mint mojito float, you’ve got yourself a winning combo that always leaves people asking for the recipe.
What Ingredients You Will Need
This recipe uses straightforward pantry staples and a few seasonal touches to give you that perfect patriotic look and taste without overcomplicating things. The ingredients work together to create a moist, flavorful cake ball with just the right sweetness and a festive finish.
- For the Cake Balls:
- 1 box vanilla cake mix (around 15.25 oz / 432g) – I prefer Duncan Hines for consistent texture
- 3 large eggs (room temperature)
- 1/2 cup vegetable oil (120 ml)
- 1 cup water (240 ml)
- 8 oz cream cheese, softened (226g) – adds creaminess and tang
- 1/2 cup unsalted butter, softened (113g) – richness and smooth texture
- 3 cups powdered sugar (360g) – for sweetness and binding
- 1 teaspoon pure vanilla extract (5 ml)
- For the Coating:
- 12 oz red candy melts (340g) – I like Candy Melts brand for vibrant color
- 12 oz white candy melts (340g)
- 12 oz blue candy melts (340g)
- Patriotic sprinkles or edible glitter (optional) for garnish
- Vegetable shortening (a tablespoon or two, optional) – to thin candy melts if needed
If you want to swap ingredients, almond flour can substitute the cake mix for a gluten-free option, though the texture will differ slightly. For dairy-free versions, coconut cream cheese and vegan butter replacements work well, but the flavor profile changes a bit. When picking candy melts, keep them covered and dry to avoid clumping, especially in humid weather.
Equipment Needed
- Mixing bowls (medium and large) – glass or metal preferred for easy cleanup
- Electric mixer – handheld or stand mixer makes blending cream cheese frosting easier
- Baking pan (9×13-inch / 23×33 cm) for cake
- Cooling rack – helps cake cool evenly before crumbling
- Large spoon or spatula for mixing
- Measuring cups and spoons – accuracy matters here
- Baking sheet lined with parchment paper or silicone mat for setting cake balls
- Microwave-safe bowls – for melting candy coatings
- Toothpicks or fork – to dip cake balls in candy melts
If you don’t have a mixer, a sturdy whisk and some elbow grease work too, but the frosting might take longer to smooth out. I’ve found that silicone spatulas are great for scraping bowls clean and folding in ingredients gently. For melting candy, take it slow in 30-second bursts to avoid burning. If you’re on a budget, reusable silicone mats save money and reduce waste compared to parchment paper.
Preparation Method
- Bake the Cake: Preheat your oven to 350°F (175°C). Prepare your 9×13-inch baking pan by greasing it lightly or lining it with parchment paper. In a large bowl, combine the vanilla cake mix, eggs, vegetable oil, and water. Beat with an electric mixer on medium speed for about 2 minutes until smooth. Pour the batter into the pan and bake for 30-35 minutes, or until a toothpick inserted in the center comes out clean. Let cool completely on a wire rack—this step is crucial to avoid soggy cake balls.
- Make the Cream Cheese Frosting: In a medium bowl, beat the softened cream cheese and butter together until creamy and smooth, about 2-3 minutes. Gradually add powdered sugar, one cup at a time, mixing well after each addition. Stir in the vanilla extract. The frosting should be thick enough to hold the crumbled cake together but soft enough to mix easily.
- Crumble the Cake: Once the cake is completely cooled, crumble it into fine crumbs using your hands or a fork. It should look like coarse sand. Avoid large chunks for easier mixing.
- Combine Cake and Frosting: Add the cream cheese frosting to the cake crumbs, starting with about 3/4 of the frosting. Mix gently with your hands or a spatula until the mixture holds together when squeezed. Add more frosting if needed—but be careful not to make it too sticky.
- Form Cake Balls: Scoop about 1.5 tablespoons (23g) of the mixture and roll between your palms into a smooth ball. Place each ball on a parchment-lined baking sheet. Chill the balls in the refrigerator for at least 1 hour or in the freezer for 15-20 minutes to firm up—this helps prevent cracking during coating.
- Prepare Candy Coatings: Melt the red, white, and blue candy melts separately in microwave-safe bowls using 30-second intervals, stirring well between each burst. Add a teaspoon of vegetable shortening if the coating is too thick—this will give a glossy finish and smoother dip.
- Dip the Cake Balls: Hold a cake ball with a toothpick or fork, dip it fully into the melted candy, and tap off excess coating gently. Place back on parchment paper. Before the coating sets, decorate with patriotic sprinkles or edible glitter if desired. Alternate colors for a festive look.
- Set and Serve: Allow the candy coating to harden completely at room temperature or in the refrigerator (about 15 minutes). Store in an airtight container until ready to serve.
Tip: If you notice cracking in the coating, the cake balls might be too cold. Bring them back to room temperature for a few minutes before dipping. Also, using a toothpick can leave a small hole; gently smooth over the hole with a little melted candy after dipping for a perfect finish.
Cooking Tips & Techniques
One trick I learned early on is to chill the cake balls thoroughly before dipping. It prevents the candy melts from cracking and keeps the balls firm. Also, don’t rush melting the candy melts—heat them gently in short bursts and stir often; burnt candy melts taste bitter and won’t coat smoothly.
When mixing the cake and frosting, less is often more. Too much frosting makes the mixture too soft and harder to roll, while too little causes crumbly balls that fall apart. The right texture feels like pliable dough—not sticky, not dry.
For an even coating, tap off excess candy melts carefully but don’t shake too hard or the coating may crack. If you find the coating too thick, thinning with a small amount of shortening helps tremendously.
Multitasking tip: While the cake cools, prepare the frosting and set up your dipping station. This way, once the cake is ready, you can jump straight into rolling and dipping without delay. This recipe is forgiving but timing matters when you want smooth, beautiful results.
Finally, storing the cake balls at room temperature avoids condensation that can dull the candy coating. If refrigerated, bring them out a bit before serving for the best flavor and texture.
Variations & Adaptations
- Flavor Twists: Swap vanilla cake mix for chocolate or red velvet for a different base. Adding a teaspoon of lemon zest to the frosting gives a fresh, zesty note that pairs well with the sweetness.
- Dietary Options: Use gluten-free cake mix and dairy-free cream cheese to make these suitable for gluten and dairy sensitivities. Coconut or almond milk help keep the frosting creamy.
- Seasonal Flavors: For a summer picnic, try adding freeze-dried strawberries or blueberries into the cake mix or sprinkle a few crushed freeze-dried berries over the white candy coating for texture and color pop.
- Different Coating Techniques: Instead of candy melts, use white chocolate tinted with gel food coloring for a richer flavor. You can also drizzle colored chocolate in stripes for a marbled look.
- Personal Favorite: I once made these cake balls with a swirl of homemade strawberry jam in the center before coating. It surprised everyone with a burst of flavor inside and was gone in minutes!
Serving & Storage Suggestions
Serve these cake balls chilled or at room temperature for the best texture. A platter arranged with alternating red, white, and blue balls is visually festive and invites guests to grab a bite. Pair them with a light summer salad or a refreshing drink like the Fresh 4th of July Salad for a balanced celebration spread.
Store leftover cake balls in an airtight container in the refrigerator for up to 5 days. If you want to freeze them, place them on a baking sheet until firm, then transfer to a freezer-safe container. Thaw overnight in the fridge before serving.
Reheat gently by letting them sit at room temperature for 15-20 minutes. The flavors often deepen after a day as the frosting and cake meld together.
Nutritional Information & Benefits
Each cake ball (about 1.5 tablespoons) contains approximately 150-180 calories, with moderate fat and sugar content. Key ingredients like cream cheese add a small amount of protein and calcium, while the cake provides quick energy from carbohydrates.
This recipe can be adapted to fit dietary needs: using gluten-free mixes or reducing sugar with alternative sweeteners. Although indulgent, the portion-controlled size helps keep treats reasonable.
From my experience, these cake balls are a delightful way to celebrate that doesn’t feel overwhelming or heavy. Plus, the vibrant colors add a festive mood that’s good for the soul as much as the taste buds.
Conclusion
These Perfect Red, White, and Blue Cake Balls are a sweet little joy that’s simple to make yet impressive enough to brighten any festive gathering. I love how the recipe invites creativity while sticking to basics that deliver consistent, delicious results. Whether you’re a seasoned baker or just craving something fun and festive, these cake balls offer a no-fuss, shareable treat that brings smiles.
Feel free to tweak the colors, flavors, or coatings to match your party vibe or personal taste. After all, the best recipes are the ones you make your own. And if you try this recipe, I’d love to hear how you personalized it or what celebration you served it at—there’s something special about swapping stories over sweet treats.
So go ahead, roll up your sleeves, and whip up a batch of these festive cake balls. They’re sure to be a hit, just like the time I paired them with my creamy Neapolitan cake for a dessert table that had everyone coming back for seconds.
FAQs
How long can I store red, white, and blue cake balls?
Store them in an airtight container in the refrigerator for up to 5 days or freeze for up to 2 months. Thaw in the fridge overnight before serving.
Can I make cake balls ahead of time?
Yes! You can prepare and freeze the cake balls before dipping. Just thaw them in the fridge and then dip in candy melts when ready.
What if my candy coating is too thick?
Add a small amount of vegetable shortening or coconut oil (about 1 teaspoon at a time) when melting to thin it out and get a smoother coating.
Can I use homemade cake instead of boxed cake mix?
Absolutely. Just make sure your homemade cake is firm and fully cooled before crumbling, so the cake balls hold together well.
How do I prevent cracks in the candy coating?
Chill the cake balls thoroughly before dipping, and avoid dipping if the balls are too cold (let them sit at room temperature for a few minutes). Also, tap off excess coating gently to prevent cracking.
Pin This Recipe!

Perfect Red White and Blue Cake Balls Recipe Easy Patriotic Party Treats
These festive red, white, and blue cake balls are a quick and easy patriotic treat perfect for summer parties and celebrations. Made with vanilla cake mix and cream cheese frosting, coated in vibrant candy melts, they are a crowd-pleaser with a moist, creamy inside and crisp candy coating.
- Prep Time: 20 minutes
- Cook Time: 35 minutes
- Total Time: 1 hour 15 minutes
- Yield: 36 cake balls 1x
- Category: Dessert
- Cuisine: American
Ingredients
- 1 box vanilla cake mix (around 15.25 oz / 432g)
- 3 large eggs (room temperature)
- 1/2 cup vegetable oil (120 ml)
- 1 cup water (240 ml)
- 8 oz cream cheese, softened (226g)
- 1/2 cup unsalted butter, softened (113g)
- 3 cups powdered sugar (360g)
- 1 teaspoon pure vanilla extract (5 ml)
- 12 oz red candy melts (340g)
- 12 oz white candy melts (340g)
- 12 oz blue candy melts (340g)
- Patriotic sprinkles or edible glitter (optional)
- Vegetable shortening (1-2 tablespoons, optional)
Instructions
- Preheat oven to 350°F (175°C). Grease or line a 9×13-inch baking pan with parchment paper.
- In a large bowl, combine vanilla cake mix, eggs, vegetable oil, and water. Beat with an electric mixer on medium speed for about 2 minutes until smooth.
- Pour batter into the prepared pan and bake for 30-35 minutes or until a toothpick inserted in the center comes out clean.
- Let cake cool completely on a wire rack.
- In a medium bowl, beat softened cream cheese and butter until creamy and smooth, about 2-3 minutes.
- Gradually add powdered sugar, one cup at a time, mixing well after each addition. Stir in vanilla extract.
- Crumble cooled cake into fine crumbs using hands or a fork.
- Add about 3/4 of the cream cheese frosting to the cake crumbs and mix gently until the mixture holds together when squeezed. Add more frosting if needed but avoid making it too sticky.
- Scoop about 1.5 tablespoons (23g) of mixture and roll into smooth balls. Place on a parchment-lined baking sheet.
- Chill cake balls in the refrigerator for at least 1 hour or freezer for 15-20 minutes to firm up.
- Melt red, white, and blue candy melts separately in microwave-safe bowls in 30-second intervals, stirring between each. Add a teaspoon of vegetable shortening if coating is too thick.
- Hold a cake ball with a toothpick or fork, dip fully into melted candy, tap off excess, and place back on parchment paper.
- Decorate with patriotic sprinkles or edible glitter before coating sets, if desired.
- Allow candy coating to harden completely at room temperature or in refrigerator for about 15 minutes.
- Store in an airtight container until ready to serve.
Notes
Chill cake balls thoroughly before dipping to prevent cracking in candy coating. Melt candy melts slowly in 30-second bursts and stir often to avoid burning. Use vegetable shortening to thin candy melts if needed. Store cake balls in airtight container in refrigerator up to 5 days or freeze up to 2 months. Bring refrigerated cake balls to room temperature before dipping to avoid cracks.
Nutrition
- Serving Size: 1 cake ball (about 1
- Calories: 165
- Sugar: 18
- Sodium: 110
- Fat: 8
- Saturated Fat: 4.5
- Carbohydrates: 22
- Protein: 2
Keywords: cake balls, patriotic dessert, red white and blue, party treats, easy cake balls, Independence Day dessert, summer dessert


