Love this? Save it for later!
Share the inspiration with your friends
I was elbow-deep in flour and sprinkles last March, trying to convince my toddler that green eggs and ham were not, in fact, on the menu for Easter brunch. My phone buzzed with a text from my sister-in-law: “What dessert are you bringing? No pressure, but the kids are expecting something fun.” Fun. Right. I stared at the half-melted butter on the counter, the open bag of pastel sprinkles I’d bought on a whim, and thought, I can work with this.
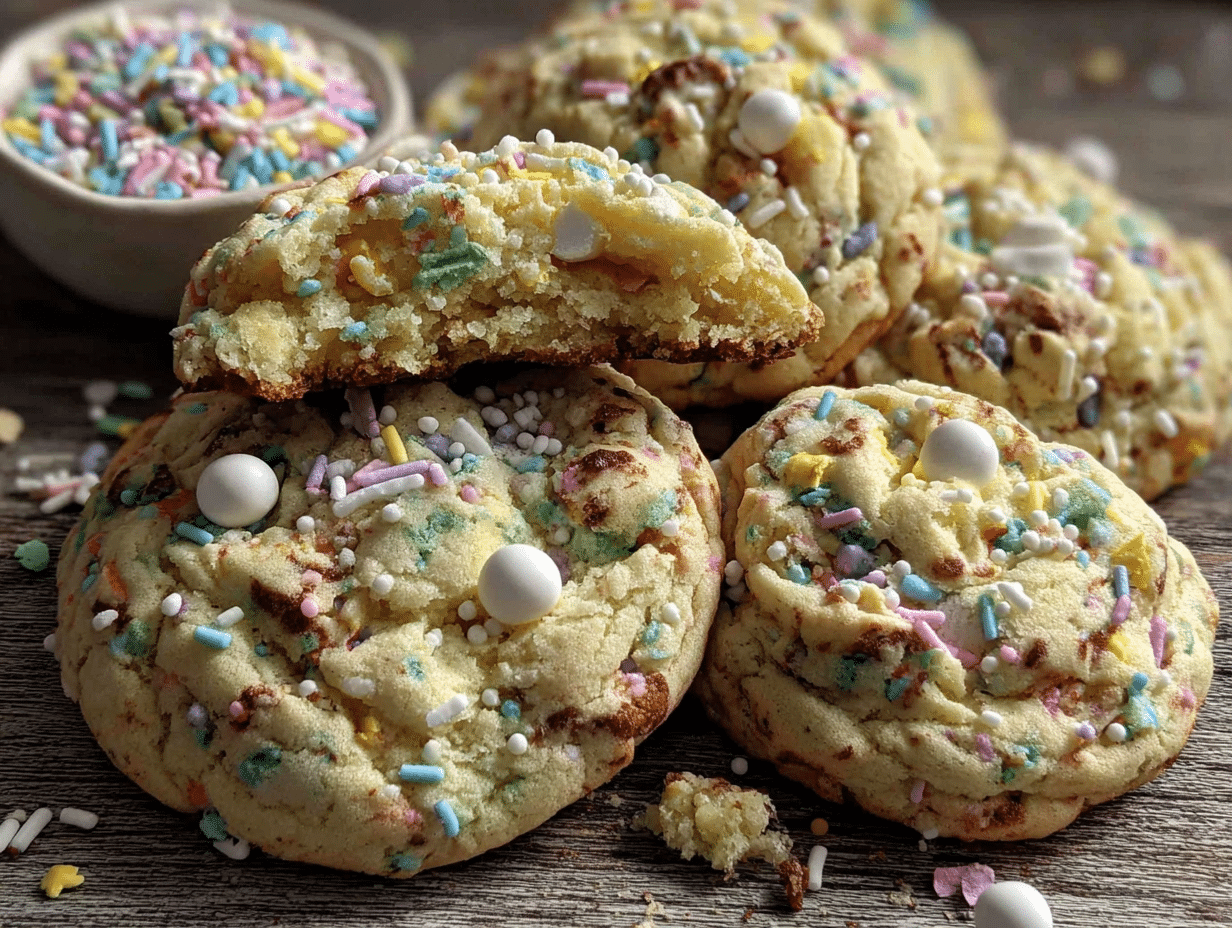
I needed something fast—no chilling dough, no rolling pin, no fuss. Something that would make a bunch of little cousins gasp. That’s when these Easy Easter Funfetti Cookies were born, right there in the chaos of a Saturday morning. They came together in one bowl, baked up soft and thick, and the sprinkles? They bled into the most gorgeous pastel confetti pattern. My sister-in-law texted back a photo of an empty plate within an hour of the party. Honestly, I think I ate three before I even left my own kitchen.
These cookies aren’t just for Easter baskets or egg hunts. They’re the kind of cookie you make when you want to bring a little joy to the table without spending all day in the kitchen. The recipe is forgiving, the ingredients are pantry staples, and the result is a bakery-style cookie that tastes like childhood. Whether you’re hosting a spring brunch or just need a quick treat to brighten a Tuesday, these funfetti cookies deliver every single time. Let me show you how easy they really are.
Why You’ll Love This Recipe
Over the years, I’ve tested more cookie recipes than I can count. Some turn out flat. Some are too cakey. Some just don’t have that wow factor. These Easy Easter Funfetti Cookies hit every single mark. Here’s why they’ve become my go-to for spring celebrations:
- Quick & Easy: From start to finish, you’re looking at about 25 minutes. No chilling. No complicated steps. Just mix, scoop, bake, and enjoy.
- Simple Ingredients: You probably have everything in your pantry right now. Butter, sugar, eggs, flour, vanilla, and a bottle of sprinkles. That’s it.
- Perfect for Easter: The pastel sprinkles make them instantly festive. They’re a hit at egg hunts, brunches, and family dinners. Plus, they travel beautifully.
- Crowd-Pleaser: Kids devour them. Adults sneak seconds. I’ve brought these to potlucks and watched them disappear faster than the deviled eggs. No joke.
- Unbelievably Delicious: The texture is what gets everyone. They’re thick, soft, and slightly chewy in the center with a delicate crisp edge. The butter and vanilla shine through, and the sprinkles add a little pop of sweetness.
What makes these different from every other funfetti cookie recipe out there? It’s the technique. I use melted butter instead of softened, which gives you that dense, fudgy texture without needing to chill the dough. The ratio of flour to butter is dialed in perfectly so the cookies stay thick and don’t spread into sad, flat discs. I’ve also tested this with multiple brands of sprinkles to make sure the colors don’t turn muddy. Trust me, this is the best version.
But here’s the thing—this recipe isn’t just good. It’s the kind of cookie that makes you close your eyes after the first bite. It’s comfort food reimagined: a little nostalgic, a little festive, and completely stress-free. Perfect for impressing guests without breaking a sweat, or turning an ordinary afternoon into something memorable. If you’ve ever had a baking fail with funfetti cookies before, this recipe will restore your faith.
What Ingredients You Will Need
This recipe uses simple, wholesome ingredients to deliver bold flavor and a satisfying texture without the fuss. Here’s everything you’ll need:
For the Cookie Dough
- 1/2 cup (113g) unsalted butter – melted and slightly cooled. I prefer using unsalted butter so I can control the salt level. If you only have salted, just reduce the added salt to 1/4 teaspoon.
- 3/4 cup (150g) granulated sugar – this gives the cookies their structure and helps create that slightly crisp edge.
- 1/4 cup (50g) light brown sugar, packed – adds moisture and a hint of molasses flavor. Don’t skip it; the brown sugar is what keeps the centers soft.
- 1 large egg – room temperature is ideal. If you forget to take it out, place it in a bowl of warm water for 5 minutes.
- 2 teaspoons vanilla extract – pure vanilla makes a difference here. I use Nielsen-Massey, but any good-quality brand works.
- 1 1/2 cups (190g) all-purpose flour – spoon and level it. Scooping directly from the bag packs in too much flour and makes the cookies dry.
- 1/2 teaspoon baking soda – helps the cookies spread just enough without turning into pancakes.
- 1/2 teaspoon salt – balances the sweetness and enhances the vanilla flavor.
- 1/2 cup (80g) pastel sprinkles – use rainbow jimmies or confetti quins. Avoid nonpareils (the tiny round balls); they tend to bleed color into the dough and turn it gray.
Ingredient Tips & Substitutions
- Butter: You can use salted butter if that’s all you have. Just skip the added salt in the recipe. The cookies will still turn out great.
- Sugar: I don’t recommend reducing the sugar—it’s crucial for texture. But if you want a less sweet cookie, you can swap 2 tablespoons of granulated sugar for coconut sugar. It will change the color slightly but tastes lovely.
- Egg: For a vegan version, use a flax egg (1 tablespoon flaxseed meal + 3 tablespoons water, let sit for 5 minutes). The texture will be slightly more cakey, but still delicious.
- Flour: A gluten-free 1:1 baking blend works perfectly here. I’ve tested this with Bob’s Red Mill and King Arthur Measure for Measure—both worked beautifully.
- Sprinkles: This is the most important part. Use high-quality sprinkles that are labeled “color-safe” or “no-bleed.” I love Sweetapolita for their vibrant pastels. Wilton’s pastel jimmies also work great. Avoid store-brand sprinkles that are dusty or faded.
One last thing—if you’re making these for a specific holiday, feel free to swap the pastel sprinkles for red, white, and blue ones for the 4th of July, or orange and black for Halloween. The recipe is totally flexible.
Equipment Needed
You don’t need a fancy kitchen to make these cookies. Here’s what I use:
- Large mixing bowl – any bowl will do, but a wide one makes mixing easier.
- Whisk – for combining the wet ingredients.
- Rubber spatula or wooden spoon – for folding in the flour and sprinkles.
- Measuring cups and spoons – accuracy matters, especially with flour and baking soda.
- Kitchen scale (optional but recommended) – weighing ingredients guarantees consistent results. I use a simple OXO scale.
- Baking sheet – a light-colored, rimmed baking sheet works best. Dark sheets can cause the bottoms to brown too quickly.
- Parchment paper or silicone baking mat – prevents sticking and makes cleanup a breeze.
- Cookie scoop (1.5 tablespoon size) – gives you evenly sized cookies that bake uniformly. If you don’t have one, use two spoons.
- Cooling rack – allows air to circulate so the cookies don’t get soggy on the bottom.
If you don’t have a cookie scoop, don’t stress. Just roll the dough into 1.5-inch balls with your hands. They don’t have to be perfect—rustic cookies taste just as good. And if you’re using a dark baking sheet, reduce the oven temperature by 25°F to prevent over-browning. I learned that the hard way after a batch of slightly burnt bottoms.
Preparation Method
Let’s get baking. This process is straightforward, but I’ll walk you through every step with the little tips I’ve picked up along the way.
- Preheat your oven to 350°F (175°C). Line two baking sheets with parchment paper or silicone mats. This ensures the cookies won’t stick and makes cleanup easy.
- Melt the butter. In a microwave-safe bowl, melt the 1/2 cup of butter in 30-second bursts until fully liquid. Set it aside to cool for 2-3 minutes. You want it warm, not hot. If it’s too hot, it will cook the egg when you mix it in.
- Mix the wet ingredients. In a large bowl, whisk together the melted butter, granulated sugar, and brown sugar until smooth. It should look like a thick, glossy paste. Add the egg and vanilla extract, then whisk vigorously for about 30 seconds until the mixture is pale and slightly thickened. This step is key—it helps create that shiny, crackly top.
- Combine the dry ingredients. In a separate small bowl, whisk together the flour, baking soda, and salt. This ensures the leavening is evenly distributed. If you skip this step, you might end up with a cookie that puffs in one spot and stays flat in another.
- Fold in the dry ingredients. Add the flour mixture to the wet mixture. Use a rubber spatula to fold gently until just combined. A few streaks of flour are okay—overmixing will make the cookies tough.
- Add the sprinkles. Gently fold in the pastel sprinkles. Don’t overmix here either, or the colors might bleed. You want those beautiful speckles of color throughout the dough.
- Scoop the dough. Using a 1.5-tablespoon cookie scoop, portion the dough into balls. Place them 2 inches apart on the prepared baking sheets. I usually fit 8 to 9 cookies per sheet.
- Bake. Bake one sheet at a time for 10-12 minutes. At the 10-minute mark, the edges should be set and lightly golden, but the centers will still look soft and slightly underdone. That’s exactly what you want. They’ll continue to set on the hot baking sheet.
- Cool. Let the cookies rest on the baking sheet for 5 minutes. This is crucial—if you try to move them too soon, they’ll fall apart. After 5 minutes, transfer them to a wire cooling rack to cool completely.
- Repeat. Scoop and bake the remaining dough. If the baking sheet is still warm, let it cool completely before adding more dough, or the cookies will spread too much.
Sensory cues: When the cookies come out of the oven, they should smell like butter and vanilla. The tops might look a little puffy and cracked. That’s the mark of a perfect funfetti cookie. The edges will be firm but the center will give slightly when you press it gently. If the entire cookie is firm, you’ve overbaked them.
Pro tip: Right after you take the cookies out of the oven, gently press a few extra sprinkles onto the tops. This makes them look bakery-fresh and ensures every bite has a sprinkle in it.
Cooking Tips & Techniques
I’ve made these Easy Easter Funfetti Cookies more times than I can count, and I’ve learned a few things along the way. Here are the tips that make the biggest difference:
- Don’t skip the brown sugar. I know it’s tempting to just use all white sugar, but the brown sugar is what gives these cookies their soft, chewy centers. It also adds a depth of flavor that plain sugar can’t match.
- Use room temperature egg. Cold egg can seize the melted butter and create a lumpy dough. If you forget, place the egg in a cup of warm water for 5 minutes. It’ll come to temperature quickly.
- Measure flour correctly. This is the #1 mistake I see in cookie recipes. Spoon the flour into your measuring cup, then level it off with a knife. If you scoop directly from the bag, you can end up with 25% more flour, which makes dry, crumbly cookies.
- Chill the dough if needed. While this recipe doesn’t require chilling, if your kitchen is very warm or your butter was too hot, the dough might be too soft. Pop it in the fridge for 15 minutes before scooping. It won’t hurt the texture.
- Bake one sheet at a time. I know it’s faster to bake two sheets at once, but the heat distribution is uneven. The top sheet will brown faster, and the bottom sheet might not spread properly. Bake in the center of the oven for best results.
- Watch the edges. The visual cue for doneness is the edges. Once they’re set and lightly golden, the cookies are ready. The centers will look underdone, but trust the process. Overbaking is the fastest way to lose that soft texture.
I once forgot to add the sprinkles until after I’d scooped the dough. I had to press them into each ball individually. They still turned out fine, but the sprinkles didn’t hold as well. Lesson learned: fold them into the dough before scooping.
Variations & Adaptations
One of the best things about this recipe is how flexible it is. Here are some variations I’ve tried and loved:
- Lemon Funfetti Cookies: Add the zest of one lemon to the wet ingredients and replace 1 teaspoon of vanilla with lemon extract. The citrus brightens the whole cookie and pairs beautifully with pastel sprinkles.
- Chocolate-Dipped: Once the cookies are completely cool, dip half of each cookie into melted white or dark chocolate. Let them set on parchment paper. It adds a fancy touch that’s perfect for gift-giving.
- Gluten-Free Version: Swap the all-purpose flour with a 1:1 gluten-free baking blend. I’ve used King Arthur Measure for Measure and Bob’s Red Mill. The texture is slightly more tender, but still delicious.
- Vegan Version: Use a flax egg (1 tablespoon flaxseed meal + 3 tablespoons water) and vegan butter like Earth Balance. The cookies will be a bit more cakey, but the flavor is spot on.
- Mini Cookie Bites: Use a 1-teaspoon cookie scoop and bake for 7-8 minutes. These are perfect for snacking or adding to an Easter charcuterie board.
- Seasonal Sprinkles: Swap the pastel sprinkles for red and green at Christmas, orange and black for Halloween, or red, white, and blue for the 4th of July. The recipe works year-round.
My personal favorite variation is the lemon version. I made it for a spring brunch last year, and a friend asked for the recipe before she even finished her first cookie. The lemon adds a little zing that cuts through the sweetness perfectly.
Serving & Storage Suggestions
These cookies are best served at room temperature. The texture is soft and chewy, and the sprinkles add a fun crunch. They’re perfect on their own, but if you want to dress them up, here are some ideas:
- Serving: Arrange them on a pastel-colored platter for Easter. Pair them with a glass of cold milk, a cup of coffee, or even a scoop of vanilla ice cream for an indulgent dessert.
- Complementary dishes: These cookies go beautifully with a creamy classic cheesecake for a dessert spread, or alongside a fresh light avocado caprese salad for a sweet-and-savory balance.
- Storage: Keep the cookies in an airtight container at room temperature for up to 5 days. They stay soft and chewy the whole time. If you stack them, place a piece of parchment paper between layers to prevent sticking.
- Freezing: You can freeze the baked cookies for up to 3 months. Place them in a single layer in a freezer-safe bag or container. Thaw at room temperature for about 30 minutes before serving. You can also freeze the raw dough balls. Scoop them onto a baking sheet, freeze until solid, then transfer to a bag. Bake from frozen, adding 2-3 minutes to the baking time.
- Reheating: Pop a cookie in the microwave for 10 seconds. It will taste like it just came out of the oven. You can also warm them in a 300°F oven for 5 minutes.
Honestly, these cookies taste even better on day two. The flavors meld together, and the texture stays perfectly soft. If you can resist eating them all in one sitting, you’re in for a treat.
Nutritional Information & Benefits
Here’s the estimated nutritional breakdown per cookie (based on 24 cookies):
- Calories: 135
- Fat: 6g
- Carbohydrates: 19g
- Protein: 2g
- Sugar: 12g
- Sodium: 85mg
These cookies are a treat, so I won’t pretend they’re health food. But they do have some redeeming qualities. The butter provides a small amount of vitamin A, and the egg adds a bit of protein. If you use the gluten-free version, you can also get some fiber from the alternative flour blend.
For those with dietary restrictions, this recipe can easily be adapted. Use the gluten-free flour blend for celiac-friendly cookies, or the vegan substitutions for a dairy-free and egg-free option. The sprinkles are typically free of common allergens, but always check the label if you’re serving someone with a sensitivity.
My personal take? These cookies are about joy, not nutrition. They’re for celebrations, lazy Sundays, and moments when you need a little sweetness in your day. And honestly, a little joy is good for the soul.
Conclusion
These Easy Easter Funfetti Cookies are the kind of recipe that makes you look like a hero with almost no effort. They’re soft, thick, and bursting with color. The dough comes together in one bowl, there’s no chilling required, and they bake up perfectly every single time. Whether you’re making them for an Easter party, a spring brunch, or just because it’s Tuesday, they never disappoint.
I love this recipe because it’s forgiving. You don’t have to be a pastry chef to nail it. You just need a little butter, a little sugar, and a whole lot of sprinkles. Feel free to customize it with your favorite flavors or seasonal colors. That’s the beauty of a simple base recipe—it’s a canvas for your creativity.
If you make these cookies, I’d love to hear about it. Leave a comment below and tell me how they turned out. Did you try a variation? Did the kids go crazy for them? Share your photos and tag me on social media. Your feedback helps me create better recipes for you. And if you’re looking for more easy dessert ideas, check out my easy patriotic sugar cookie bars for another festive treat.
Happy baking, friend. May your cookies be soft, your sprinkles be vibrant, and your Easter be full of joy.
Frequently Asked Questions
Can I use salted butter instead of unsalted?
Yes, you can. Just reduce the added salt in the recipe to 1/4 teaspoon. The cookies will still taste great.
Why did my cookies spread too much?
This usually happens if the butter was too hot or the dough was too warm. Make sure your melted butter has cooled for a few minutes before mixing. If your kitchen is warm, chill the dough for 15 minutes before baking.
Can I make the dough ahead of time?
Absolutely. You can refrigerate the dough for up to 3 days. Let it sit at room temperature for 10 minutes before scooping. You can also freeze the dough balls for up to 3 months.
What kind of sprinkles work best?
Use rainbow jimmies or confetti quins. They hold their color and shape well. Avoid nonpareils (tiny round balls) as they tend to bleed and turn the dough gray.
How do I keep the cookies soft?
Store them in an airtight container at room temperature. Add a slice of bread to the container—it absorbs excess moisture and keeps the cookies soft. Replace the bread every couple of days.
Pin This Recipe!

Easy Easter Funfetti Cookies: Best Soft Recipe
These Easy Easter Funfetti Cookies are soft, thick, and bursting with pastel sprinkles. Made in one bowl with no chilling required, they’re the perfect quick and festive treat for Easter brunches, egg hunts, or any spring celebration.
- Prep Time: 10 minutes
- Cook Time: 12 minutes
- Total Time: 22 minutes
- Yield: 24 cookies 1x
- Category: Dessert
- Cuisine: American
Ingredients
- 1/2 cup (113g) unsalted butter, melted and slightly cooled
- 3/4 cup (150g) granulated sugar
- 1/4 cup (50g) light brown sugar, packed
- 1 large egg, room temperature
- 2 teaspoons vanilla extract
- 1 1/2 cups (190g) all-purpose flour, spooned and leveled
- 1/2 teaspoon baking soda
- 1/2 teaspoon salt
- 1/2 cup (80g) pastel sprinkles (jimmies or confetti quins)
Instructions
- Preheat your oven to 350°F (175°C). Line two baking sheets with parchment paper or silicone mats.
- Melt the butter in a microwave-safe bowl in 30-second bursts until fully liquid. Set aside to cool for 2-3 minutes.
- In a large bowl, whisk together the melted butter, granulated sugar, and brown sugar until smooth and glossy.
- Add the egg and vanilla extract, then whisk vigorously for about 30 seconds until the mixture is pale and slightly thickened.
- In a separate small bowl, whisk together the flour, baking soda, and salt.
- Add the flour mixture to the wet mixture. Use a rubber spatula to fold gently until just combined (a few streaks of flour are okay).
- Gently fold in the pastel sprinkles until evenly distributed.
- Using a 1.5-tablespoon cookie scoop, portion the dough into balls and place them 2 inches apart on the prepared baking sheets (8-9 cookies per sheet).
- Bake one sheet at a time for 10-12 minutes, until the edges are set and lightly golden but the centers still look soft.
- Let the cookies rest on the baking sheet for 5 minutes, then transfer to a wire cooling rack to cool completely.
- Repeat with remaining dough, letting the baking sheet cool completely before adding more dough.
Notes
For best results, use high-quality ‘color-safe’ sprinkles to prevent bleeding. If your kitchen is warm, chill the dough for 15 minutes before baking. For a bakery-fresh look, press a few extra sprinkles onto the tops right after baking.
Nutrition
- Serving Size: 1 cookie
- Calories: 135
- Sugar: 12
- Sodium: 85
- Fat: 6
- Saturated Fat: 3.5
- Carbohydrates: 19
- Protein: 2
Keywords: Easter cookies, funfetti cookies, soft cookies, spring cookies, sprinkle cookies, easy cookie recipe


