Love this? Save it for later!
Share the inspiration with your friends
My phone buzzed at 9:47 PM on a Tuesday. It was my sister. “Class party tomorrow. Need 24 cupcakes. You’re my only hope.” No pressure, right? I stared at my pantry—a box of Oreos, a bag of chocolate chips, and the usual baking suspects. Then I spotted the candy eyes leftover from Halloween. And just like that, the idea hit me like a sugar rush.
I wasn’t about to whip out piping bags and attempt some fancy frosting sculpture at ten o’clock at night. I needed something that looked like I spent hours on it but actually came together in about forty minutes. These little guys—Oreo Owl Cupcakes—were born from that very specific kind of desperation. And honestly? They stole the show.
There’s something about a dessert that makes people stop and smile before they even take a bite. These cupcakes do exactly that. The kids at the party went absolutely wild, and the parents kept asking how I got the owls to look so cute without any special tools. The secret is simpler than you think. You don’t need a pastry degree or a drawer full of fancy nozzles. You just need some basic baking skills, a handful of Oreos, and that little spark of creativity we all have hiding somewhere.
These Easy Oreo Owl Cupcakes have become my go-to for bake sales, birthday parties, and those moments when you just want to make something fun. They’re the kind of treat that makes you feel like a kitchen rockstar without the stress.
Why You’ll Love This Recipe
Let me tell you why these little owls have earned a permanent spot in my baking rotation. I’ve tested this recipe about six times (my neighbors have definitely benefited), and each batch taught me something new about getting that perfect owl face.
- Incredibly Easy : We’re talking twenty minutes of active prep time. The oven does most of the work, and the decorating is basically just assembly. No fancy piping skills required.
- Simple Ingredients : You probably have most of this stuff already. Oreos, cupcake mix (or your favorite from-scratch recipe), candy eyes, and some chocolate chips. That’s it.
- Perfect for Parties : Whether it’s a classroom celebration, a Halloween gathering, or just a rainy afternoon activity with the kids, these owls fit right in. They’re not too sweet, not too plain—just right.
- Crowd-Pleaser : I’ve watched grown adults get genuinely excited over these cupcakes. There’s something about the little owl faces that makes everyone feel like a kid again.
- Unbelievably Cute : The texture is soft chocolate cake with creamy frosting, and the Oreo wings and eyes add that perfect crunch. It’s comfort food that looks like art.
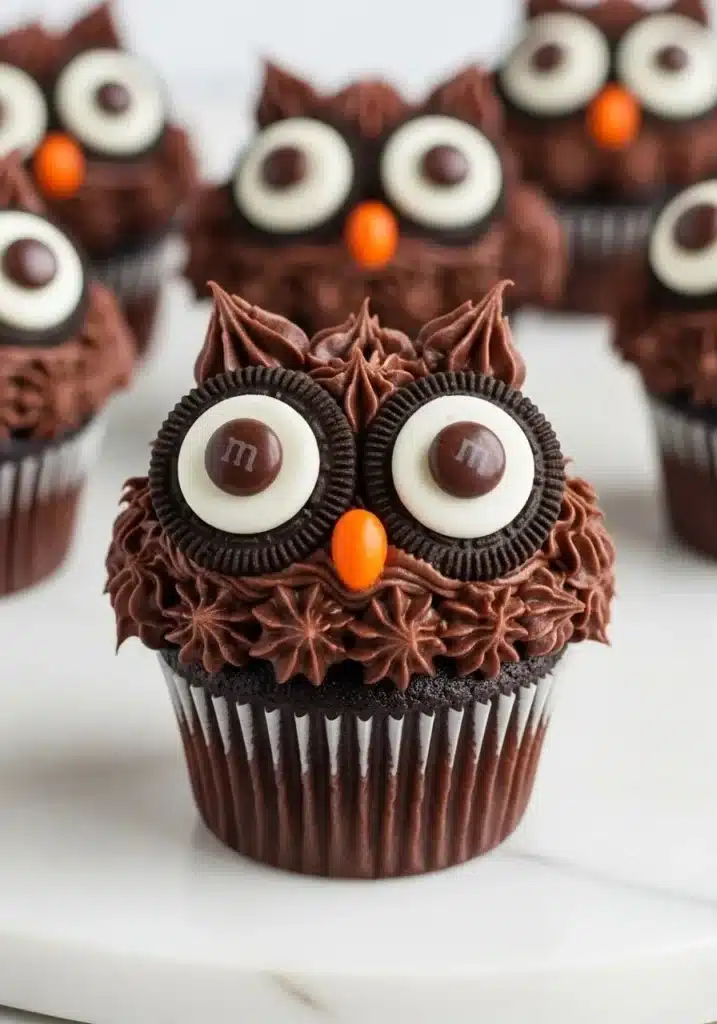
What makes these different from other themed cupcakes? It’s the technique. Instead of trying to sculpt frosting into owl shapes (which always ends up looking like a sad blob), we use whole Oreos for the wings and halved Oreos for the eyes. It’s genius because it looks intentional and polished, but it’s actually the easiest shortcut ever. The result is a cupcake that looks store-bought but tastes homemade.
These cupcakes aren’t just good—they’re the kind that makes people say “wait, you made these?” with that impressed tone. It’s baking magic without the magic wand.
What Ingredients You Will Need
This recipe uses simple, everyday ingredients to create something that looks like it came from a fancy bakery. The beauty is in how you assemble them, not in complicated components.
For the Cupcakes
- 1 box chocolate cake mix (or your favorite homemade recipe) — I prefer Duncan Hines for its consistent texture, but any brand works. If you’re feeling ambitious, a from-scratch chocolate cake batter is lovely here too.
- Eggs, oil, and water — whatever your cake mix calls for. I use large eggs at room temperature for better incorporation.
- 1 teaspoon vanilla extract — adds warmth and depth to the chocolate flavor. Pure vanilla is worth the splurge here.
For the Frosting
- 1 cup unsalted butter (softened) — salted butter works too, just reduce any added salt. Let it sit out for about an hour before starting.
- 3 cups powdered sugar — sifted if you want extra smooth frosting, but I rarely bother and it turns out fine.
- 2 tablespoons heavy cream — milk works in a pinch, but cream makes it silkier. Add more if needed for spreading consistency.
- 1 teaspoon vanilla extract
- Pinch of salt — balances the sweetness perfectly.
For the Owl Decorations
- 24 Oreo cookies (regular size) — you’ll need about 1.5 packages. The classic ones work best because they’re sturdy. Avoid double-stuff for this—they’re too thick and fall apart when you cut them.
- 48 candy eyes — you can find these at craft stores or online. Wilton brand is reliable. If you can’t find them, use white chocolate chips with a tiny dot of melted dark chocolate for the pupil.
- 24 chocolate chips (semi-sweet or milk) — these become the little beaks. Mini chocolate chips work even better if you have them.
- Yellow food coloring (optional) — for tinting a small amount of frosting to make little feet. Totally optional but adds a cute touch.
One thing I’ve learned the hard way: don’t try to use double-stuff Oreos for the wings. They’re too tall and the cream filling squishes out everywhere. Stick with the classic ones. Also, if you’re making these ahead, wait to add the candy eyes until right before serving. They can get a little soft if they sit in the fridge too long.
Equipment Needed
You don’t need a fully stocked professional kitchen for these owls. Here’s what you’ll want:
- Muffin tin — standard 12-cup size. I’ve used both non-stick and dark metal pans. Dark metal tends to brown the edges faster, so check a few minutes early.
- Cupcake liners — any color works, but I like using orange or brown for fall-themed owls, or any fun pattern for general parties. Avoid the foil liners—they’re pretty but the cupcakes tend to stick.
- Electric mixer — hand mixer or stand mixer both work. I’ve made the frosting by hand with a whisk before and let me tell you, it’s a workout. Use the mixer.
- Piping bag or zip-top bag — for the frosting. A zip-top bag with the corner snipped off works perfectly. No need to buy special piping bags.
- Sharp knife — for cutting the Oreos in half. A serrated knife works best because it cuts through the cookie without shattering it. I learned this after destroying about six Oreos with a regular knife.
- Cooling rack — essential for letting cupcakes cool completely before frosting. Frosting warm cupcakes is a recipe for a melty mess.
- Small offset spatula — helpful but not necessary. A butter knife works fine for spreading.
If you don’t have piping bags, just use a sturdy zip-top bag. Snip about a quarter-inch off the corner and you’re good to go. I actually prefer this method because there’s less cleanup.
Preparation Method
Alright, let’s make some owls. Here’s the step-by-step process that I’ve perfected through trial and error (and a few lopsided owl faces).
- Preheat and prep. Preheat your oven to 350°F (175°C). Line your muffin tin with 24 cupcake liners. This recipe makes about two dozen cupcakes, so if you only have one tin, you’ll bake in batches.
- Make the cupcake batter. In a large bowl, combine the chocolate cake mix with the eggs, oil, and water according to package directions. Add the vanilla extract and mix until smooth. Don’t overmix—about 30 seconds on medium speed is plenty. Overmixing makes the cupcakes tough.
- Fill and bake. Fill each liner about two-thirds full. I use a cookie scoop for this—it keeps things consistent. Bake for 18-22 minutes, or until a toothpick inserted in the center comes out with just a few moist crumbs. Let them cool in the pan for 5 minutes, then transfer to a cooling rack. Here’s the important part: let them cool completely. I mean completely. If they’re even slightly warm, the frosting will slide right off.
- Make the frosting. While the cupcakes cool, beat the softened butter with an electric mixer until smooth and creamy—about 2 minutes. Add the powdered sugar one cup at a time, mixing on low speed to avoid a sugar cloud. Add the heavy cream, vanilla extract, and salt. Beat on medium-high for 3-4 minutes until light and fluffy. If it’s too thick, add another tablespoon of cream. Too thin? Add a bit more powdered sugar.
- Prepare the Oreos. This step requires patience. Take 12 Oreos and carefully twist them apart. You want the half with the cream intact. Set those aside for the eyes. Take the remaining 12 Oreos and cut them in half crosswise with a serrated knife. These become the wings. You should have 24 half-Oreos for the wings and 24 cream-side-up Oreo halves for the eyes.
- Frost the cupcakes. Transfer the frosting to a piping bag (or zip-top bag with the corner snipped). Pipe a generous swirl of frosting onto each cooled cupcake. Don’t worry about making it perfect—the Oreos will cover most of it. You want enough frosting to hold the decorations but not so much that it squishes out the sides.
- Add the eyes. Take those cream-side-up Oreo halves and press two of them gently into the top of each frosted cupcake. They should be positioned slightly apart, like two big owl eyes. Press them in just enough so they stay put but the cream doesn’t squish out.
- Add the candy eyes. Place one candy eye in the center of each Oreo half. Press gently. The frosting underneath will help them stick.
- Add the beak. Place one chocolate chip (pointy side down) between the two Oreo eyes. This becomes the little owl beak. Position it so it sits just below the eyes.
- Add the wings. Take those half-Oreos and press one into each side of the cupcake, angled slightly outward like little wings. The flat cut side should face inward toward the center.
- Optional feet. If you want to add little feet, tint a tablespoon of leftover frosting with yellow food coloring. Pipe two tiny triangles at the bottom of each cupcake. This is totally optional but adds an extra “aww” factor.
- Let them set. Place the finished cupcakes in the fridge for about 15 minutes to let the frosting firm up. This helps everything stay in place when you transport them.
A quick note: when you’re cutting the Oreos, go slow. I’ve shattered many cookies by rushing. Use a gentle sawing motion with a serrated knife and you’ll get clean halves every time.
Cooking Tips & Techniques
After making these owls more times than I care to admit, I’ve picked up a few tricks that make the process smoother.
Room temperature ingredients matter. I know, I know—everyone says this. But it’s true. Cold butter doesn’t cream properly, and cold eggs can make your batter lumpy. Set everything out about an hour before you start baking. Your frosting will be silkier, and your cupcakes will rise more evenly.
Don’t overfill the liners. I made this mistake the first time. I thought “more batter = bigger cupcake = more room for owl face.” Wrong. The cupcakes overflowed and I ended up with flat, ugly tops that were impossible to decorate. Two-thirds full is the sweet spot.
Cooling is not optional. I once got impatient and frosted slightly warm cupcakes. The frosting melted into a puddle, and my owl eyes slid right off. It looked like a sad, melted snowman. Wait the full time. Trust me on this.
Work in batches. If you’re making the full 24, decorate them in groups of 6. The frosting can start to crust over if it sits too long, and the candy eyes won’t stick as well. Decorate 6 at a time, then move to the next batch.
For the cleanest Oreo cuts, chill them first. Pop the Oreos in the fridge for 10 minutes before cutting. The cookie becomes less crumbly and you’ll get cleaner halves. I learned this after a particularly frustrating batch that looked like a cookie massacre.
Timing strategy: Bake the cupcakes the day before and store them in an airtight container. The next day, make the frosting and decorate. This breaks up the work and ensures the cupcakes are completely cool. Plus, day-old cupcakes are actually easier to decorate because they’re firmer.
Variations & Adaptations
One of the best things about this recipe is how easy it is to change up. Here are some variations I’ve tried and loved.
Halloween Owls : Use orange cupcake liners and add a tiny candy pumpkin next to each owl. I did this for a Halloween party and they were gone in ten minutes. You can also use orange-tinted frosting for the base instead of chocolate.
Fall Owls : Swap the chocolate cake for spice cake or pumpkin cake mix. The warm flavors pair beautifully with the chocolate Oreos. Add a sprinkle of cinnamon on top for extra fall vibes.
Gluten-Free Version : Use a gluten-free chocolate cake mix and gluten-free Oreos (yes, they exist!). The decorating process is exactly the same. I’ve tested this with my gluten-sensitive friend and she said they were just as good.
Mini Owl Cupcakes : Use a mini muffin tin and bake for about 10-12 minutes. Use mini Oreos for the wings and eyes. These are perfect for parties where you want people to try multiple desserts without committing to a full cupcake.
Chocolate Lovers’ Version : Add a tablespoon of cocoa powder to your frosting for double-chocolate owls. Use dark chocolate Oreos for an even richer flavor. My husband requests this version every time.
Different Bird Species : Get creative! Use different colored candy eyes or arrange the Oreos differently to make other birds. I once made little penguins by using white frosting and black Oreos arranged differently. The possibilities are endless.
One variation I personally love: during the holidays, I use red and green M&Ms for the eyes instead of candy eyes. It gives them a festive look and adds a little extra chocolate flavor.
Serving & Storage Suggestions
These owls are best served at room temperature. The frosting softens up nicely and the Oreos have just the right amount of crunch. If you’ve refrigerated them, let them sit out for about 20 minutes before serving.
Presentation ideas: Arrange them on a large platter with the owls facing different directions. It looks adorable, like a little owl gathering. For Halloween, place them on a black platter with some fake spiderwebs around the edges. For a birthday party, set them up on a cupcake stand with the owls facing outward.
What to serve with them: A cold glass of milk is the obvious choice. For an adults-only gathering, they pair surprisingly well with a dark stout beer or a coffee stout. The chocolate and coffee flavors complement each other beautifully. You could also serve them alongside a creamy classic cheesecake for a dessert spread that covers all the bases.
Storage: Store the decorated cupcakes in an airtight container in the refrigerator for up to 3 days. The candy eyes might get a little soft after a day, so if you’re making them ahead, add the eyes right before serving. I usually decorate the cupcakes fully, store them in the fridge, and then add the candy eyes about an hour before serving.
Freezing: You can freeze the undecorated cupcakes for up to 3 months. Wrap each one individually in plastic wrap, then place them in a freezer bag. When you’re ready to decorate, thaw them at room temperature (still wrapped) for about 2 hours, then frost and decorate as usual. The texture is almost identical to fresh.
Reheating: These are meant to be eaten at room temperature, but if you want a warm treat, microwave an undecorated cupcake for about 10 seconds. Don’t microwave the decorated ones—the candy eyes will melt and the Oreos will get soggy.
One thing I’ve noticed: the flavors actually get better after a day in the fridge. The Oreo cream softens slightly and melds with the frosting. They’re still delicious on day one, but day two is where the magic happens.
Nutritional Information & Benefits
Let’s be real—these are cupcakes. They’re a treat, not a health food. But here’s the estimated breakdown per cupcake (based on 24 servings):
| Nutrient | Amount per Cupcake |
|---|---|
| Calories | ~280 |
| Total Fat | 14g |
| Saturated Fat | 7g |
| Carbohydrates | 38g |
| Sugar | 26g |
| Protein | 3g |
| Sodium | 220mg |
On the bright side, there’s a tiny bit of iron from the chocolate and a small amount of calcium from the butter and cream. The Oreos provide a little bit of fiber (yes, really—about 1g per cookie).
Dietary considerations: This recipe contains gluten, dairy, and eggs. For a dairy-free version, use vegan butter and plant-based milk in the frosting. For egg-free, use a flax egg substitute in the cake mix. The Oreos themselves are actually vegan, which is a fun fact.
Potential allergens: Wheat, milk, eggs, soy (in the Oreos). If you’re serving these at a school party, check with parents about allergies first. I usually make a small batch of gluten-free ones on the side just to be safe.
My personal perspective? These are a sometimes food, not an everyday food. But when you do make them, make them count. Use good quality ingredients, take your time with the decorating, and enjoy every single bite. Life is too short for boring desserts.
Conclusion
These Easy Oreo Owl Cupcakes are proof that you don’t need fancy skills or expensive tools to make something that looks and tastes incredible. They’re the kind of recipe that makes you look like a baking hero with minimal effort. The chocolate cake is soft and rich, the frosting is creamy and sweet, and the Oreo decorations add that perfect crunch and charm.
What I love most about this recipe is how it brings people together. I’ve made these for classroom parties, family gatherings, and casual get-togethers, and every single time, someone asks for the recipe. They’re conversation starters. They’re smile-makers. They’re the little bit of whimsy that turns an ordinary day into something special.
So go ahead—give these owls a try. Customize them however you want. Make them your own. And when you do, I’d love to hear about it. Drop a comment below and tell me how your owls turned out. Did you try a different flavor? Add your own twist? Share a photo? I’m all ears. And if you’re looking for more fun dessert ideas, check out this easy no-bake layered dessert for another crowd-pleasing option.
Happy baking, friends. May your cupcakes rise high and your owls be ever so cute.
Frequently Asked Questions
Can I use a different cake flavor?
Absolutely! Vanilla, yellow, or even red velvet cake work great. Just keep in mind that the chocolate Oreos will stand out more against a lighter cake color. Spice cake is particularly good for fall-themed owls.
How far in advance can I make these?
You can bake the cupcakes up to 3 days ahead and store them in an airtight container. Decorate them the day you plan to serve them for the best appearance. If you need to decorate ahead, wait to add the candy eyes until just before serving.
My Oreos keep breaking when I cut them. What am I doing wrong?
Two things: use a serrated knife and a gentle sawing motion. Also, chilling the Oreos for 10 minutes in the fridge before cutting makes them less likely to shatter. If they still break, don’t worry—just use the broken pieces creatively. The owl wings don’t have to be perfect.
Can I make these without a piping bag?
Yes! A zip-top bag with the corner snipped off works perfectly. You can also just use a butter knife to spread the frosting. The owls will still look adorable—the Oreos cover most of the frosting anyway.
How do I transport these without messing up the decorations?
Place each cupcake in a cupcake carrier or arrange them in a single layer in a shallow container with a lid. If you’re stacking, use a piece of wax paper between layers. Refrigerate them for 30 minutes before transporting to help the frosting firm up. And drive carefully!
Pin This Recipe!
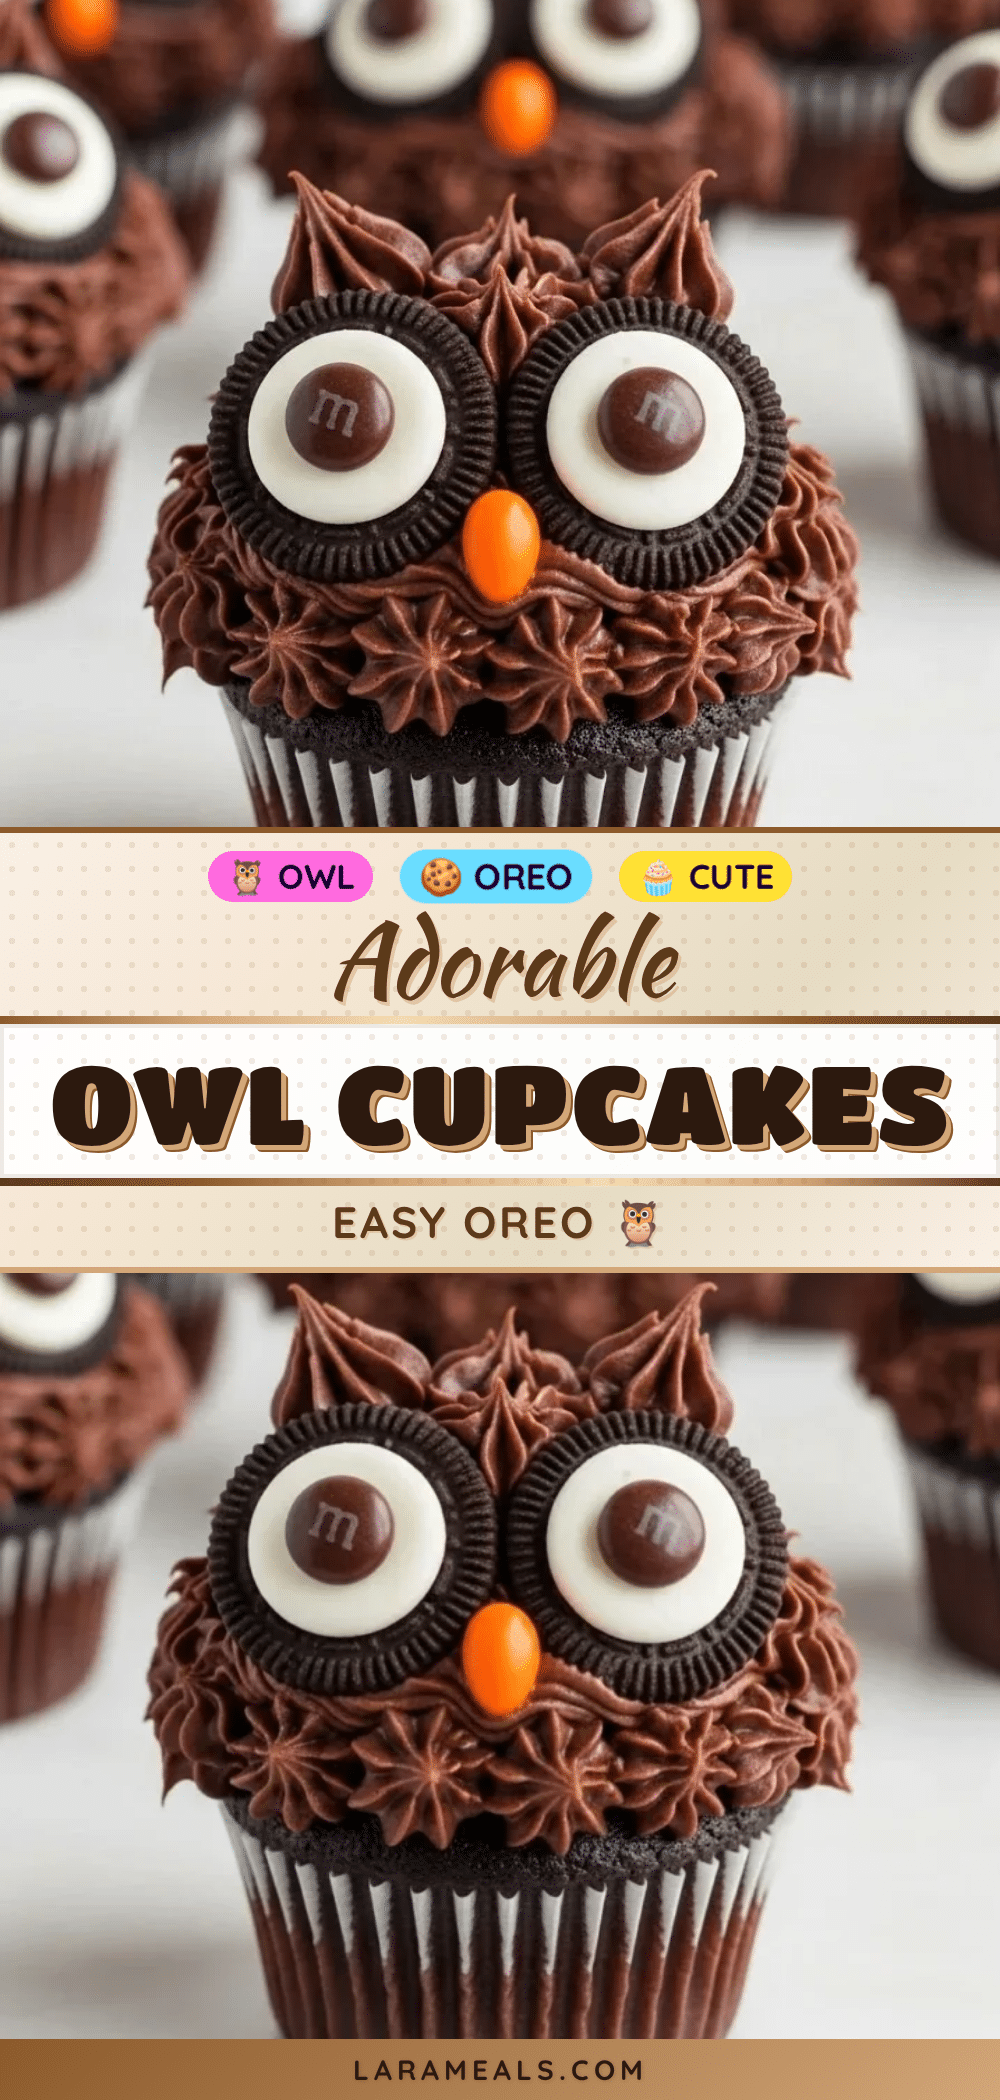
Easy Oreo Owl Cupcakes: Best Fun Treat
These adorable Oreo Owl Cupcakes are incredibly easy to make with simple ingredients and no fancy piping skills required. Perfect for parties, bake sales, or any occasion where you want to impress with minimal effort.
- Prep Time: 20 minutes
- Cook Time: 20 minutes
- Total Time: 40 minutes
- Yield: 24 servings 1x
- Category: Dessert
- Cuisine: American
Ingredients
- 1 box chocolate cake mix (e.g., Duncan Hines)
- Eggs, oil, and water (as called for by cake mix)
- 1 teaspoon vanilla extract
- 1 cup unsalted butter (softened)
- 3 cups powdered sugar
- 2 tablespoons heavy cream
- 1 teaspoon vanilla extract (for frosting)
- Pinch of salt
- 24 Oreo cookies (regular size, not double-stuff)
- 48 candy eyes
- 24 chocolate chips (semi-sweet or milk, mini preferred)
- Yellow food coloring (optional, for feet)
Instructions
- Preheat oven to 350°F (175°C). Line muffin tin with 24 cupcake liners.
- In a large bowl, combine chocolate cake mix with eggs, oil, and water according to package directions. Add 1 teaspoon vanilla extract and mix until smooth (about 30 seconds on medium speed). Do not overmix.
- Fill each liner about two-thirds full. Bake for 18-22 minutes, or until a toothpick inserted in the center comes out with a few moist crumbs. Cool in pan for 5 minutes, then transfer to a cooling rack and cool completely.
- While cupcakes cool, make frosting: Beat softened butter with electric mixer until smooth and creamy (about 2 minutes). Add powdered sugar one cup at a time, mixing on low speed. Add 2 tablespoons heavy cream, 1 teaspoon vanilla extract, and pinch of salt. Beat on medium-high for 3-4 minutes until light and fluffy. Adjust consistency with more cream or powdered sugar if needed.
- Prepare Oreos: Carefully twist 12 Oreos apart, keeping the half with cream intact for eyes. Cut remaining 12 Oreos in half crosswise with a serrated knife for wings. You should have 24 cream-side-up Oreo halves and 24 half-Oreos.
- Transfer frosting to a piping bag or zip-top bag with corner snipped. Pipe a generous swirl of frosting onto each cooled cupcake.
- Press two cream-side-up Oreo halves gently into the top of each frosted cupcake, positioned slightly apart like owl eyes.
- Place one candy eye in the center of each Oreo half.
- Place one chocolate chip (pointy side down) between the two Oreo eyes for the beak.
- Press one half-Oreo into each side of the cupcake, angled slightly outward like wings, with flat cut side facing inward.
- Optional: Tint a tablespoon of leftover frosting with yellow food coloring and pipe two tiny triangles at the bottom of each cupcake for feet.
- Refrigerate finished cupcakes for about 15 minutes to let frosting firm up before serving.
Notes
Use regular Oreos, not double-stuff, for easier cutting and assembly. Chill Oreos for 10 minutes before cutting for cleaner halves. Wait to add candy eyes until just before serving if making ahead, as they can soften in the fridge. Cupcakes can be baked up to 3 days ahead and stored in an airtight container; decorate the day of serving for best appearance.
Nutrition
- Serving Size: 1 cupcake
- Calories: 280
- Sugar: 26
- Sodium: 220
- Fat: 14
- Saturated Fat: 7
- Carbohydrates: 38
- Fiber: 1
- Protein: 3
Keywords: Oreo cupcakes, owl cupcakes, easy cupcakes, fun treats, party desserts, Halloween cupcakes, chocolate cupcakes


