Love this? Save it for later!
Share the inspiration with your friends
The first time I pulled a loaf of Amish white bread from the oven, I honestly thought I’d messed something up. The top was a deep golden brown, the kitchen smelled like a bakery on a Saturday morning, and the crust made that faint crackling sound as it cooled. But I was convinced I had over-proofed it, or under-kneaded it, or maybe used the wrong kind of butter. I sliced into it anyway, holding my breath. The crumb was soft, airy, and so tender it practically fell apart under the butter knife. My husband walked in, grabbed a slice without saying a word, and walked right back out. He came back five minutes later with a second slice, this time slathered in strawberry jam. That was the moment I knew this recipe was a keeper.
I had been chasing that perfect homemade loaf for months. You know the one—the bread that tastes like it came from a small-town bakery, with a golden crust and a pillowy interior that makes toast feel like a special occasion. I tried a dozen recipes before landing on this version. Some were too dense. Others were too sweet. A few required ingredients I didn’t have on hand, like potato flour or specialty yeast. But this classic Amish white bread recipe is different. It uses simple pantry staples—flour, milk, butter, sugar, yeast, and salt—and delivers a loaf that is soft, slightly sweet, and absolutely foolproof.
What makes this recipe stick is the method. It’s not complicated, but it’s intentional. The way the dough feels when it’s ready to rise. The smell of yeast blooming in warm milk. The quiet satisfaction of watching the dough double in size under a clean kitchen towel. This is the kind of bread that becomes a ritual, not just a recipe. And honestly, it’s the one loaf I keep coming back to, week after week, because it never lets me down.
Why You’ll Love This Recipe
This isn’t just another bread recipe. This is the one you’ll bake for holiday dinners, lazy Sunday mornings, and everything in between. Here’s why it stands out:
- Simple Ingredients: You probably already have everything in your pantry. No special flours, no obscure additives—just milk, butter, sugar, yeast, salt, and all-purpose flour.
- Foolproof Method: I’ve tested this recipe more times than I can count, and it delivers consistent results every single time. The dough is forgiving, the rise is reliable, and the finished loaf is always soft and tender.
- Perfect for Beginners and Experts Alike: If you’ve never baked bread before, this is a great place to start. The steps are clear, the timing is generous, and the dough is easy to work with. If you’re a seasoned baker, you’ll appreciate how quickly this comes together.
- Versatile: Use it for sandwiches, toast, French toast, bread pudding, or just eat it warm with a pat of butter. It’s a true all-purpose loaf.
- Crowd-Pleaser: I’ve brought this bread to potlucks, family dinners, and neighbor drop-offs, and it always gets the same reaction: “Can I have the recipe?”
- Better Than Store-Bought: Once you taste homemade bread fresh from the oven, you’ll never go back to the bagged stuff. The texture is softer, the flavor is richer, and the satisfaction is unmatched.
What makes this recipe different from other white bread recipes is the balance of fat and sugar. The milk and butter create a tender crumb, while the sugar adds just a hint of sweetness without making it taste like dessert. It’s the kind of bread that feels both comforting and special—the kind you close your eyes after the first bite of.
What Ingredients You Will Need
This recipe uses simple, wholesome ingredients to deliver a soft, slightly sweet loaf with a beautiful golden crust. Here’s what you’ll need:
For the Dough:
- 1 cup (240 ml) whole milk – Whole milk adds richness and tenderness to the crumb. You can use 2% if that’s what you have, but avoid skim milk as it may yield a slightly drier loaf.
- 1/2 cup (120 ml) water – Helps bring the dough together and keeps it from being too heavy. Use warm water (around 110°F) to activate the yeast.
- 1/4 cup (50 g) granulated sugar – Adds a subtle sweetness and helps the yeast bloom. It also contributes to a soft, golden crust.
- 1 packet (2 1/4 teaspoons) active dry yeast – I prefer Red Star or Fleischmann’s for consistent results. If using instant yeast, you can skip the blooming step and add it directly to the flour.
- 1/4 cup (56 g) unsalted butter, melted – Butter adds flavor and tenderness. I recommend using a good-quality butter like Kerrygold for the best taste.
- 1 teaspoon salt – Balances the sweetness and strengthens the gluten structure. Fine sea salt works best.
- 4 cups (500 g) all-purpose flour – Spoon and level your flour for the most accurate measurement. Too much flour will make the dough dry and dense.
For the Topping:
- 2 tablespoons (28 g) unsalted butter, melted – Brushed over the warm loaf for a soft, glossy crust. You can skip this if you prefer a crustier top.
Ingredient Selection Tips:
- Look for milk that is fresh and not close to its expiration date. Fresh milk gives the best flavor and texture.
- If you’re using salted butter, reduce the added salt to 3/4 teaspoon to avoid an overly salty loaf.
- For a slightly richer flavor, substitute 1/4 cup of the all-purpose flour with bread flour. This will give the bread a bit more structure and chew.
Substitution Guidance:
- Dairy-Free: Use unsweetened almond milk or oat milk in place of whole milk, and substitute the butter with a dairy-free margarine or coconut oil. Note that the flavor and texture will be slightly different.
- Gluten-Free: This recipe is not suitable for a gluten-free diet as written. For a gluten-free version, you’ll need a high-quality gluten-free all-purpose flour blend and may need to adjust the liquid ratio.
- Lower Sugar: You can reduce the sugar to 2 tablespoons, but the bread will be less sweet and the crust may not brown as deeply.
Equipment Needed
You don’t need a lot of fancy equipment to make this bread. Here’s what I use:
- Stand mixer with dough hook – Makes kneading effortless, but you can absolutely knead by hand. If you’re using a mixer, a KitchenAid or similar model works great.
- Large mixing bowl – For proofing the dough. Glass or ceramic works best as they retain heat.
- 9×5-inch loaf pan – A standard metal or glass loaf pan is perfect. If using a dark non-stick pan, reduce the baking temperature by 25°F to prevent over-browning.
- Clean kitchen towel or plastic wrap – For covering the dough while it rises.
- Cooling rack – Essential for cooling the bread evenly and preventing a soggy bottom.
- Pastry brush – For brushing the melted butter on top of the warm loaf.
Budget-Friendly Alternatives:
- If you don’t have a stand mixer, you can knead the dough by hand on a lightly floured surface for 8-10 minutes. It’s a great arm workout!
- No loaf pan? Shape the dough into a round boule and bake it on a parchment-lined baking sheet. The shape will be different, but the bread will still be delicious.
Preparation Method
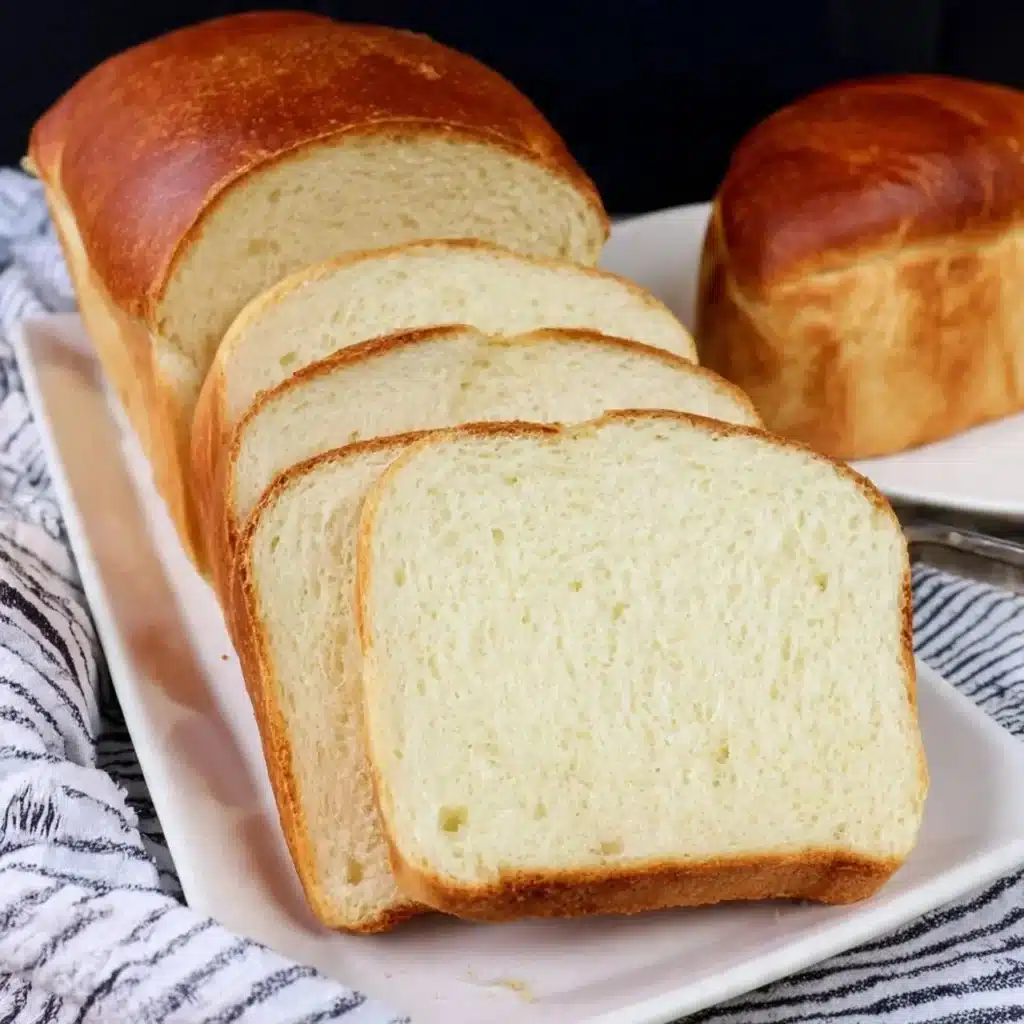
Let’s walk through this step by step. I’ve included time estimates and sensory cues so you know exactly what to look for at each stage.
- Bloom the yeast (5 minutes): In a small bowl, combine the warm water (about 110°F) and 1 tablespoon of the sugar. Stir gently, then sprinkle the yeast on top. Let it sit for 5 minutes until it becomes frothy and smells like bread. If it doesn’t foam, your yeast may be dead—start over with fresh yeast.
- Warm the milk (2 minutes): In a small saucepan or microwave-safe bowl, warm the milk until it’s just warm to the touch (about 110°F). You don’t want it too hot, or it will kill the yeast. Stir in the remaining sugar, melted butter, and salt.
- Combine wet ingredients: In the bowl of your stand mixer (or a large mixing bowl), combine the yeast mixture and the milk mixture. Stir gently to combine.
- Add the flour (3 minutes): Add 2 cups of the flour and mix on low speed until combined. Gradually add the remaining 2 cups of flour, one cup at a time, until a soft dough forms. The dough should be slightly sticky but not wet. If it’s too sticky, add a tablespoon of flour at a time until it pulls away from the sides of the bowl.
- Knead the dough (8-10 minutes by mixer, 10-12 minutes by hand): Knead on medium-low speed for about 8 minutes, or until the dough is smooth, elastic, and springs back when you poke it. If kneading by hand, turn the dough out onto a lightly floured surface and knead with the heels of your hands, folding and turning the dough as you go. The dough should feel soft and supple, not stiff.
- First rise (1 to 1.5 hours): Place the dough in a lightly greased bowl, turning once to coat the top. Cover with a clean kitchen towel and let it rise in a warm, draft-free spot until doubled in size. This usually takes about 1 hour at room temperature. If your kitchen is cool, it may take longer. The dough is ready when you poke it gently with a finger and the indentation stays.
- Shape the loaf (5 minutes): Punch down the dough to release the air. Turn it out onto a lightly floured surface and shape it into a rectangle about 8×6 inches. Starting from the short end, roll the dough tightly into a log, pinching the seam to seal. Tuck the ends under and place the loaf seam-side down in a greased 9×5-inch loaf pan.
- Second rise (45 minutes to 1 hour): Cover the loaf loosely with the towel and let it rise again until it crowns about 1 inch above the rim of the pan. This is the most important rise—don’t rush it. The bread should look puffy and soft.
- Preheat the oven (15 minutes before baking): Set your oven to 350°F (175°C). Place a rack in the center position.
- Bake (30-35 minutes): Bake the loaf until the top is deep golden brown and the bread sounds hollow when you tap it. If the top is browning too quickly, tent it loosely with foil for the last 10 minutes. An instant-read thermometer inserted into the center should read 190°F.
- Cool (10 minutes in pan, then 1 hour on rack): Remove the loaf from the pan and place it on a cooling rack. Brush the top with the melted butter while it’s still warm. Let it cool completely before slicing—this is the hardest part, I know, but it’s worth it. Slicing too early will make the bread gummy.
Cooking Tips & Techniques
Over the years, I’ve learned a few things the hard way. Here are my best tips for perfect Amish white bread every time:
- Temperature matters: Yeast is a living thing, and it’s picky about temperature. Too hot, and you’ll kill it. Too cold, and it won’t activate. Aim for 110°F for your liquids—it should feel like warm bath water on your wrist.
- Don’t over-flour: One of the most common mistakes is adding too much flour during kneading. The dough should be soft and slightly tacky, not dry. If it feels stiff, you’ve added too much flour. A little stickiness is okay—it bakes out.
- Use a warm spot for rising: I like to turn my oven on to the lowest setting for 2 minutes, then turn it off and place the covered bowl inside. The residual warmth creates the perfect environment for rising. Alternatively, place the bowl near a sunny window or on top of the fridge.
- Check for doneness: An instant-read thermometer is your best friend here. The bread is done when it reaches 190°F internally. If you don’t have a thermometer, tap the bottom of the loaf—it should sound hollow.
- Cool completely: I know it’s tempting to slice into a warm loaf, but trust me—waiting is worth it. Slicing too early compresses the crumb and makes the bread gummy. Let it cool for at least an hour on a wire rack.
A personal failure I learned from: The first time I made this bread, I rushed the second rise. I was impatient and baked it after only 30 minutes. The loaf came out dense and flat, with a tough crust. Now I always set a timer and let the dough fully crown above the pan. Patience pays off.
Variations & Adaptations
This recipe is incredibly versatile. Here are a few ways to make it your own:
- Cinnamon Swirl Bread: After rolling the dough into a log, spread 2 tablespoons of softened butter over the surface and sprinkle with a mixture of 1/4 cup sugar and 1 tablespoon cinnamon. Roll it up and bake as directed. The result is a beautiful swirl of cinnamon goodness—perfect for toast.
- Herb and Garlic Bread: Add 1 teaspoon of dried rosemary, 1 teaspoon of dried thyme, and 2 minced garlic cloves to the flour mixture. The savory version is fantastic alongside a bowl of soup or a hearty stew.
- Whole Wheat Version: Substitute half of the all-purpose flour with whole wheat flour. You’ll need to add an extra 2-3 tablespoons of milk, as whole wheat flour absorbs more liquid. The loaf will be denser but still delicious.
- Dairy-Free Adaptation: Use unsweetened oat milk and a dairy-free butter substitute. I’ve tried this with Miyoko’s vegan butter, and it worked beautifully—the loaf was still soft and tender.
- Small Batch: Halve the recipe and bake it in a 8×4-inch loaf pan. Reduce the baking time to 25-30 minutes.
I personally love the cinnamon swirl variation. I make it for Christmas morning, and it’s always the first thing to disappear from the table.
Serving & Storage Suggestions
Serving: This bread is best served warm, with a generous pat of butter and maybe a drizzle of honey. It’s also fantastic for sandwiches, French toast, or bread pudding. For a simple breakfast, toast a slice and top it with your favorite jam or nut butter.
Storage: Store the bread in a paper bag at room temperature for up to 3 days. Avoid plastic bags, as they trap moisture and make the crust soggy. If you live in a humid climate, you can store it in a bread box or wrapped in a clean kitchen towel.
Freezing: This bread freezes beautifully. Wrap the cooled loaf tightly in plastic wrap, then in a layer of aluminum foil. Freeze for up to 3 months. To thaw, leave it at room temperature for 4-6 hours, or pop it in a 300°F oven for 10 minutes to refresh the crust.
Reheating: For that just-baked taste, warm slices in a toaster or under the broiler for a minute or two. You can also wrap the whole loaf in foil and warm it in a 300°F oven for 10-15 minutes.
Nutritional Information & Benefits
Here’s the estimated nutritional breakdown for one slice (based on 12 slices per loaf):
- Calories: 180
- Fat: 6g
- Saturated Fat: 3.5g
- Cholesterol: 15mg
- Sodium: 200mg
- Carbohydrates: 28g
- Fiber: 1g
- Sugar: 6g
- Protein: 4g
Health Benefits: While this is a treat bread, it does offer some nutritional value. The milk provides calcium and vitamin D, while the butter adds a small amount of vitamin A. The all-purpose flour provides energy in the form of carbohydrates. For a healthier twist, you can use whole wheat flour for added fiber.
Dietary Considerations: This recipe contains dairy and gluten. It is not suitable for vegan, dairy-free, or gluten-free diets without modifications. It is low in cholesterol compared to many other baked goods.
Conclusion
This classic Amish white bread is the kind of recipe that becomes a staple in your kitchen. It’s simple enough for a weekday bake, but special enough for holidays and gatherings. The soft, tender crumb and golden crust are exactly what homemade bread should be—comforting, satisfying, and absolutely delicious.
I love this recipe because it reminds me that good things don’t have to be complicated. A few basic ingredients, a little patience, and the willingness to get your hands a bit floury are all it takes to create something truly wonderful. Whether you’re a first-time baker or a seasoned pro, I hope you give this recipe a try. Customize it with your favorite add-ins, share it with the people you love, and don’t forget to save a slice for yourself.
If you make this bread, I’d love to hear about it! Leave a comment below and let me know how it turned out, or share your own twist on the recipe. And if you’re looking for more easy homemade bread recipes, check out my cozy slow cooker chicken and dumplings for another comforting meal idea.
Happy baking, friends!
Frequently Asked Questions
Can I use instant yeast instead of active dry yeast?
Yes, you can. If using instant yeast, skip the blooming step and add it directly to the flour. Reduce the water by 2 tablespoons, as instant yeast requires less liquid. The rise time may be slightly shorter.
Why did my bread turn out dense?
Dense bread is usually caused by one of three things: not enough kneading (underdeveloped gluten), too much flour added during kneading, or insufficient rising time. Make sure your dough is soft and elastic before the first rise, and let it double in size before shaping.
Can I make this bread without a stand mixer?
Absolutely! Kneading by hand works just as well. It takes a bit more time and effort, but it’s a great way to connect with the dough. Just knead on a lightly floured surface for 10-12 minutes until the dough is smooth and springs back when poked.
How do I know when the bread is fully baked?
An instant-read thermometer is the most reliable method. The bread is done when it reaches 190°F internally. You can also tap the bottom of the loaf—if it sounds hollow, it’s ready. The top should be deep golden brown.
Can I freeze the dough instead of the baked loaf?
Yes, you can freeze the dough after the first rise. Punch it down, wrap it tightly in plastic wrap, and freeze for up to 1 month. Thaw it in the refrigerator overnight, then let it come to room temperature before shaping and proceeding with the second rise.
Pin This Recipe!
Best Amish White Bread Recipe – Easy Homemade Loaf

This classic Amish white bread is soft, slightly sweet, and absolutely foolproof. Made with simple pantry staples, it delivers a golden crust and pillowy interior that makes toast feel like a special occasion.
- Prep Time: 20 minutes
- Cook Time: 30 minutes
- Total Time: 2 hours 30 minutes
- Yield: 12 servings 1x
- Category: Bread
- Cuisine: American
Ingredients
- 1 cup (240 ml) whole milk
- 1/2 cup (120 ml) water
- 1/4 cup (50 g) granulated sugar
- 1 packet (2 1/4 teaspoons) active dry yeast
- 1/4 cup (56 g) unsalted butter, melted
- 1 teaspoon salt
- 4 cups (500 g) all-purpose flour
- 2 tablespoons (28 g) unsalted butter, melted (for topping)
Instructions
- Bloom the yeast: In a small bowl, combine the warm water (about 110°F) and 1 tablespoon of the sugar. Stir gently, then sprinkle the yeast on top. Let it sit for 5 minutes until it becomes frothy and smells like bread.
- Warm the milk: In a small saucepan or microwave-safe bowl, warm the milk until it’s just warm to the touch (about 110°F). Stir in the remaining sugar, melted butter, and salt.
- Combine wet ingredients: In the bowl of your stand mixer (or a large mixing bowl), combine the yeast mixture and the milk mixture. Stir gently to combine.
- Add the flour: Add 2 cups of the flour and mix on low speed until combined. Gradually add the remaining 2 cups of flour, one cup at a time, until a soft dough forms. The dough should be slightly sticky but not wet.
- Knead the dough: Knead on medium-low speed for about 8 minutes, or until the dough is smooth, elastic, and springs back when you poke it. If kneading by hand, turn the dough out onto a lightly floured surface and knead for 10-12 minutes.
- First rise: Place the dough in a lightly greased bowl, turning once to coat the top. Cover with a clean kitchen towel and let it rise in a warm, draft-free spot until doubled in size, about 1 to 1.5 hours.
- Shape the loaf: Punch down the dough to release the air. Turn it out onto a lightly floured surface and shape it into a rectangle about 8×6 inches. Starting from the short end, roll the dough tightly into a log, pinching the seam to seal. Tuck the ends under and place the loaf seam-side down in a greased 9×5-inch loaf pan.
- Second rise: Cover the loaf loosely with the towel and let it rise again until it crowns about 1 inch above the rim of the pan, about 45 minutes to 1 hour.
- Preheat the oven: Set your oven to 350°F (175°C). Place a rack in the center position.
- Bake: Bake the loaf until the top is deep golden brown and the bread sounds hollow when you tap it, about 30-35 minutes. If the top is browning too quickly, tent it loosely with foil for the last 10 minutes. An instant-read thermometer inserted into the center should read 190°F.
- Cool: Remove the loaf from the pan and place it on a cooling rack. Brush the top with the melted butter while it’s still warm. Let it cool completely before slicing.
Notes
For best results, use whole milk and unsalted butter. If using salted butter, reduce added salt to 3/4 teaspoon. For a dairy-free version, use unsweetened almond milk or oat milk and dairy-free margarine. Let the bread cool completely before slicing to avoid a gummy texture.
Nutrition
- Serving Size: 1 slice
- Calories: 180
- Sugar: 6
- Sodium: 200
- Fat: 6
- Saturated Fat: 3.5
- Carbohydrates: 28
- Fiber: 1
- Protein: 4
Keywords: Amish white bread, homemade bread, easy bread recipe, soft white bread, classic white bread


