Love this? Save it for later!
Share the inspiration with your friends
I was standing in my kitchen at 10 PM on a Tuesday, staring into the fridge like it held the secrets to the universe. It had been one of those days where everything went sideways—my toddler refused to nap, my work deadline got pushed up, and I had eaten a handful of goldfish crackers for lunch. I needed something sweet. Not a full-blown cake (too much effort), not a store-bought cookie (too disappointing). I wanted that nostalgic birthday cake flavor, but I also wanted to feel good about what I was eating. That’s when the idea hit me, right there in the glow of the refrigerator light.
I grabbed a jar of almond butter, some vanilla protein powder, and a bag of sprinkles I had stashed for my daughter’s birthday party last month. I figured I could throw something together, maybe a quick no-bake bite that wouldn’t require turning on the oven. Honestly, I wasn’t expecting much. I just wanted a small, guilt-free treat to salvage the day.
What came out of that late-night experiment was something I genuinely didn’t expect. These healthy birthday cake protein balls tasted like a party in your mouth, but they were packed with protein, fiber, and good fats. No refined sugar, no baking, no stress. I stood there eating three of them in a row, feeling like I had cracked some kind of kitchen code. They were soft, slightly chewy, and studded with colorful sprinkles that made me smile after a rough day.
Now I make a batch every Sunday, and they never last past Wednesday. My husband steals them for his lunchbox, my daughter calls them “fairy balls,” and I finally have a snack that feels like a celebration without the sugar crash. If you have ever wanted a birthday cake that actually supports your health goals, this one is for you.
Why You’ll Love This Recipe
These healthy birthday cake protein balls are not just another snack recipe. They are the result of weeks of testing, tweaking, and taste-testing by my family and a few brave friends who volunteered as taste-testers. Here is why they keep coming back for more:
- Quick & Easy: You can make these in under 15 minutes. No oven, no mixer, no complicated steps. Just a bowl, a spoon, and your hands.
- Simple Ingredients: You probably already have most of these in your pantry. No weird superfood powders or expensive specialty items. Just real food that works.
- Perfect for Meal Prep: These protein balls keep well in the fridge for up to two weeks, and they freeze beautifully. Grab one on your way out the door or pack them in lunchboxes for a happy surprise.
- Crowd-Pleaser: I have brought these to playdates, office potlucks, and even a birthday party. Kids love the sprinkles, adults love the flavor, and nobody guesses they are healthy unless I tell them.
- Unbelievably Delicious: The combination of creamy almond butter, sweet vanilla, and crunchy sprinkles creates a texture and taste that honestly rivals a real slice of cake. You will not feel deprived eating these.
What makes this recipe different from the hundreds of other protein ball recipes out there? It is the balance. Many recipes are either too dry, too sticky, or too sweet. I spent a lot of time getting the ratio of wet to dry ingredients just right so you get a soft, rollable dough that holds together without being a mess. Plus, I use a specific trick with the vanilla extract and a pinch of salt to mimic that classic birthday cake flavor profile. It is subtle but game-changing. This is not just another version of a healthy snack—it is my best version, and I am pretty proud of it.
What Ingredients You Will Need
This recipe uses simple, wholesome ingredients to deliver that nostalgic birthday cake flavor without any of the junk. Most of these are pantry staples, so you can whip up a batch anytime the craving hits.
- Rolled oats (1 cup / 90g): Use certified gluten-free oats if needed. Old-fashioned oats work best here—they give the balls a nice chewy texture. Quick oats can be used but will make the texture a bit softer.
- Vanilla protein powder (1/2 cup / 50g): I recommend a high-quality vanilla whey or plant-based protein powder. My personal favorite is Orgain Simple Vanilla because it is not overly sweet and mixes well. If your protein powder is already sweetened, you might want to skip or reduce the maple syrup.
- Almond butter (1/2 cup / 120g): Natural, drippy almond butter works best. Avoid the kind with added sugar or palm oil, as it can make the dough too stiff. You can also use cashew butter or sunflower seed butter for a nut-free option.
- Maple syrup (3 tablespoons / 45ml): Pure maple syrup adds just the right amount of sweetness without refined sugar. Honey works too, but it changes the flavor slightly.
- Coconut flour (2 tablespoons / 15g): This is the secret ingredient that binds everything together without making the balls dry. Coconut flour absorbs moisture really well, so do not skip it. If you do not have coconut flour, you can use oat flour or almond flour, but the texture will be slightly different.
- Vanilla extract (1 teaspoon): Use pure vanilla extract for the best flavor. Imitation vanilla works in a pinch, but the taste is not quite as nice.
- Rainbow sprinkles (3 tablespoons): This is where the birthday cake magic happens. Use natural sprinkles if you want to avoid artificial dyes—I like the brand Supernatural. Avoid jimmies or nonpareils, as they can bleed color into the dough.
- Pinch of salt (1/4 teaspoon): Salt balances the sweetness and enhances the vanilla flavor. Do not skip it.
- Optional: White chocolate chips (2 tablespoons): For extra indulgence, fold in some mini white chocolate chips. They add little pockets of sweetness that make these taste even more like real cake.
I have tested this recipe with different protein powders, and the key is to pay attention to the consistency. If your dough feels too dry, add a teaspoon of water or almond milk at a time until it holds together. If it feels too sticky, add a little more coconut flour. Trust your hands—they will tell you when it is right.
Equipment Needed
You do not need much for this recipe, which is part of the beauty. Here is what you will need:
- Large mixing bowl: Any medium-to-large bowl will work. I use a glass mixing bowl because it is easy to clean and does not retain odors.
- Measuring cups and spoons: Accurate measurements matter here, especially for the coconut flour and protein powder. A kitchen scale is even better if you have one.
- Spatula or wooden spoon: For mixing the dough. A silicone spatula is great for scraping the sides.
- Baking sheet or plate: To hold the rolled balls while you shape them. Line it with parchment paper for easy cleanup.
- Parchment paper: Optional but helpful for preventing sticking.
- Small cookie scoop (1 tablespoon size): This makes portioning the dough super consistent and fast. If you do not have one, just use a spoon and your hands.
- Refrigerator: The balls need at least 30 minutes to firm up before you eat them. Patience is a virtue here.
If you are new to making energy balls, do not worry about having fancy equipment. I have made these with just a fork and a bowl in a hotel room, and they turned out fine. The most important tool is your hands—they are the best judges of texture.
Preparation Method
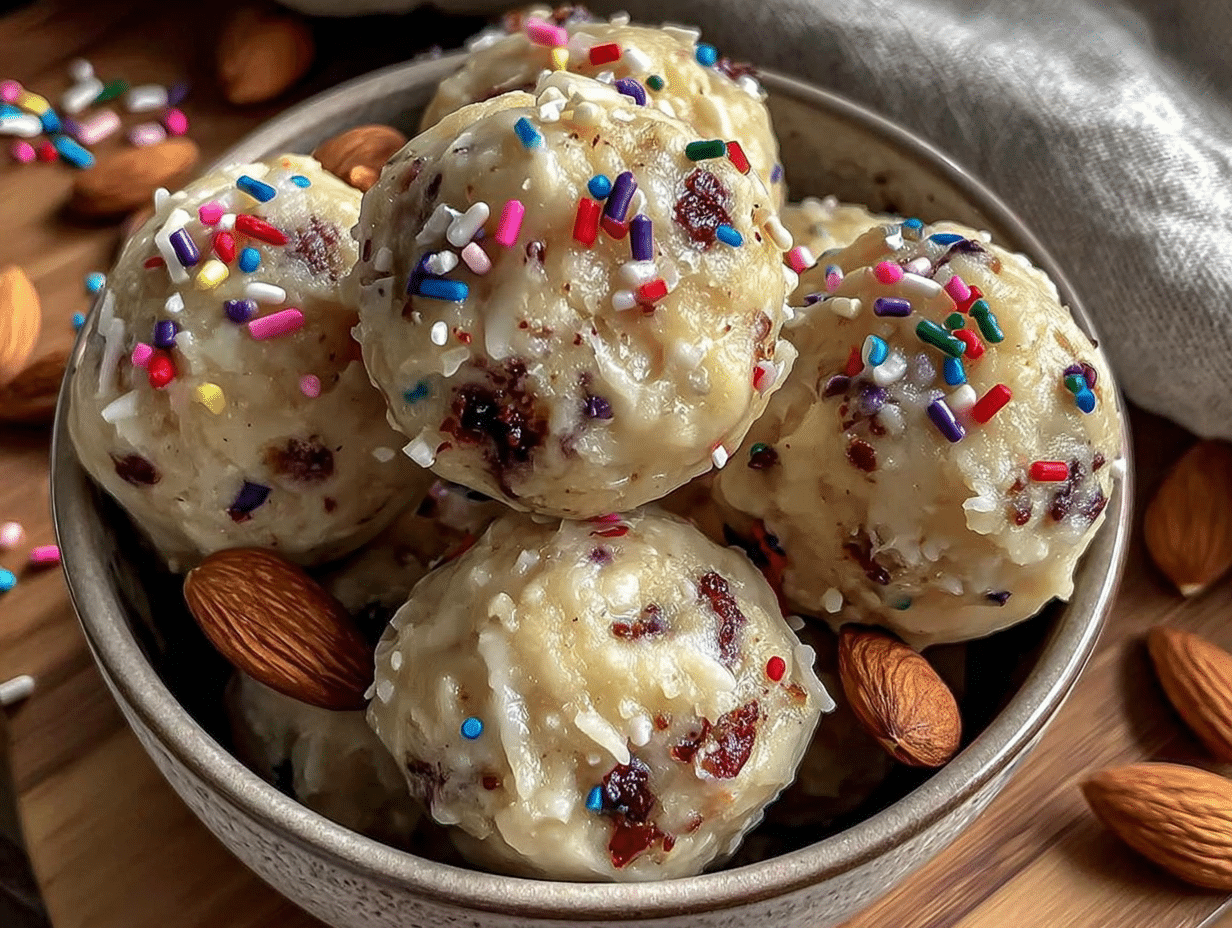
Follow these steps, and you will have a batch of birthday cake protein balls ready in no time. I have added some sensory cues and troubleshooting tips along the way so you know exactly what to look for.
- Mix the dry ingredients: In a large mixing bowl, combine the rolled oats, vanilla protein powder, coconut flour, and salt. Stir with a spatula until everything is evenly distributed. You will see the protein powder coat the oats, and the mixture will look a little dusty—that is normal.
- Add the wet ingredients: Pour in the almond butter, maple syrup, and vanilla extract. Stir everything together until a thick dough forms. At first, it will seem like the wet ingredients are not mixing in, but keep going. The dough will come together after about 30 seconds of vigorous stirring. It should feel slightly sticky but not wet. If it feels too dry, add a teaspoon of water. If it feels too sticky, add a tablespoon more oats or a teaspoon more coconut flour.
- Fold in the sprinkles: Gently fold in the rainbow sprinkles (and white chocolate chips if using) with your spatula. Be careful not to overmix, or the sprinkles might start to bleed their color into the dough. You want little pops of color throughout.
- Chill the dough (optional but helpful): If your dough feels too soft to roll, pop the bowl in the fridge for 10-15 minutes. This makes the rolling step much easier, especially if your kitchen is warm. I usually skip this step in winter but find it helpful in summer.
- Roll into balls: Scoop out about 1 tablespoon of dough and roll it between your palms to form a smooth ball. Place each ball on the parchment-lined baking sheet. You should get about 14-16 balls, depending on your protein powder and how tightly you roll them. If the dough sticks to your hands, lightly wet your palms with water or rub a tiny bit of coconut oil on them.
- Chill to set: Place the baking sheet in the refrigerator for at least 30 minutes. This step is non-negotiable—the balls need time to firm up so they hold their shape. After 30 minutes, they should be firm to the touch but still soft when you bite into them.
- Store and enjoy: Transfer the protein balls to an airtight container. Keep them in the fridge for up to two weeks, or freeze them for up to three months. I like to keep a small container in the fridge for easy snacking and freeze the rest for later.
One tip I learned the hard way: do not skip the coconut flour. I once tried to substitute it with almond flour because I ran out, and the balls were too greasy and fell apart. Coconut flour is the binder here, so stick with it if you can. Also, if your protein powder is on the drier side, you might need an extra tablespoon of almond butter to get the right consistency. Trust your instincts—you will know when the dough feels right.
Cooking Tips & Techniques
Over the months of making these protein balls, I have collected a few tips that make the process smoother and the results better. Here is what I have learned:
- Use room temperature ingredients: If your almond butter is straight from the fridge, it will be too stiff to mix properly. Let it sit out for 15 minutes before you start, or microwave it for 10 seconds to soften it. Same goes for maple syrup—cold syrup is thicker and harder to incorporate.
- Don’t overmix the sprinkles: This is a rookie mistake I made more than once. If you stir the sprinkles too aggressively, the colors will bleed into the dough, and you will end up with grayish-green blobs instead of cheerful rainbow balls. Fold gently, just until the sprinkles are distributed.
- Use a cookie scoop for even portions: A 1-tablespoon cookie scoop is my favorite tool for this recipe. It gives you perfectly uniform balls every time, which means they all chill at the same rate. No more guessing if one ball is twice the size of another.
- Wet your hands if the dough sticks: This is a game-changer. Keep a small bowl of water nearby, and dip your fingers in before rolling each ball. The water creates a barrier between the sticky dough and your skin, making the process much less frustrating.
- Let them rest before eating: I know it is tempting to eat one right away, but trust me—they taste much better after they have chilled for at least 30 minutes. The flavors meld together, and the texture becomes perfectly firm yet soft. Warm protein balls are just not the same.
- Double the batch if you can: These freeze so well that there is no reason to make just one batch. I always double the recipe and freeze half. It takes the same amount of time, and you will thank yourself later when you need a quick snack.
One mistake I made early on was using a protein powder that was very chalky. It made the balls dry and crumbly, and no amount of extra almond butter could fix it. If you have a protein powder you do not love for drinking, do not assume it will work here. Stick with a powder you actually enjoy the taste of—it makes a big difference.
Variations & Adaptations
One of the best things about this recipe is how easy it is to customize. Here are some variations I have tried and loved:
- Chocolate Birthday Cake: Swap the vanilla protein powder for chocolate protein powder, and use chocolate sprinkles instead of rainbow. Add a tablespoon of cocoa powder for extra richness. It tastes like a chocolate fudge cake in ball form.
- Vegan Version: Use a plant-based vanilla protein powder (I like Orgain or Garden of Life) and maple syrup instead of honey. Make sure your sprinkles are vegan-friendly—some contain beeswax or shellac. Everything else in the recipe is already plant-based.
- Nut-Free Option: Replace the almond butter with sunflower seed butter or tahini. Sunflower seed butter works beautifully, though it will give the balls a slightly greenish tint (that is normal—it is a chemical reaction with the baking soda in the protein powder). If you use tahini, add an extra tablespoon of maple syrup to balance the bitterness.
- Gluten-Free Adaptation: Use certified gluten-free rolled oats and double-check that your sprinkles are gluten-free. Most are, but it is worth verifying. The recipe is already gluten-free if you use GF oats.
- Lower Sugar Option: Reduce the maple syrup to 2 tablespoons and use an unsweetened vanilla protein powder. The balls will be less sweet but still have that birthday cake flavor from the vanilla and sprinkles. You can also add a few drops of stevia if you want extra sweetness without the sugar.
- Funfetti Cake Batter Balls: For an even more decadent version, add 2 tablespoons of dry vanilla cake mix (just the powder, not prepared) to the dough. This is not the healthiest option, but it tastes incredibly close to real cake batter. I save this variation for special occasions.
My personal favorite variation is the chocolate birthday cake version. I made it for my husband’s birthday last year, and he said they were better than the actual cake I made. (I am not bitter about it at all.) The combination of chocolate and sprinkles hits that nostalgic sweet spot without being overwhelming.
Serving & Storage Suggestions
These protein balls are incredibly versatile when it comes to serving and storing. Here is what works best:
Serving: Serve these protein balls chilled or at room temperature. I prefer them straight from the fridge because they are firmer and more satisfying to bite into. If you are packing them for a lunchbox or a picnic, let them sit out for about 10 minutes before eating so they soften slightly. They pair beautifully with a glass of cold milk, a cup of coffee, or even a smoothie for a complete snack. For a fun presentation, arrange them on a plate with fresh berries and a drizzle of melted white chocolate—perfect for a birthday party or a baby shower.
Storage: Store the protein balls in an airtight container in the refrigerator. They will stay fresh for up to two weeks, though they rarely last that long in my house. If you want to keep them longer, freeze them on a baking sheet until solid (about 1 hour), then transfer them to a freezer-safe bag or container. They will keep in the freezer for up to three months. To thaw, just move them to the fridge overnight or let them sit at room temperature for 15-20 minutes.
Flavor development: Here is something interesting—these protein balls actually taste better the next day. The flavors meld together as they sit, and the texture becomes more uniform. I have made a batch on Sunday and found them at their peak on Tuesday. So do not be discouraged if they taste a little flat right after making them. Give them time, and they will reward you.
If you are looking for another easy snack idea, you might also enjoy this delicious brownie protein bites recipe for a chocolatey twist on healthy snacking. For a refreshing drink to pair with these balls, try this refreshing raspberry mint mojito rebel float for a fun summer treat.
Nutritional Information & Benefits
Here is an estimated nutritional breakdown for one protein ball (based on 15 balls per batch):
| Nutrient | Amount per ball |
|---|---|
| Calories | 95 |
| Protein | 5g |
| Carbohydrates | 10g |
| Fiber | 2g |
| Sugar | 5g |
| Fat | 4.5g |
| Iron | 3% DV |
These protein balls are packed with nutritional benefits. The rolled oats provide slow-digesting carbohydrates and soluble fiber, which helps keep your blood sugar stable and your energy levels steady. Almond butter offers healthy monounsaturated fats, vitamin E, and magnesium—great for heart health and muscle function. The vanilla protein powder adds a solid protein boost, making these balls a satisfying snack that actually keeps you full. Plus, the sprinkles (yes, even the sprinkles) add a little joy, which is its own kind of nutrition.
This recipe is naturally gluten-free if you use certified GF oats, and it can be made vegan with simple swaps. It is also free from refined sugar, using only maple syrup for sweetness. Potential allergens include tree nuts (almond butter) and dairy (check your protein powder). Always read labels if you are cooking for someone with allergies.
I love that I can give these to my daughter without worrying about a sugar crash later. They are a treat that actually supports her energy and focus, which is a win in my book.
Conclusion
These healthy birthday cake protein balls are proof that you do not have to choose between eating well and enjoying what you eat. They are quick to make, easy to customize, and genuinely delicious. Whether you need a post-workout snack, a lunchbox treat, or a late-night craving buster, these little balls deliver every time.
I encourage you to make them your own. Swap the sprinkles for your favorite color, add some shredded coconut, or experiment with different protein powders. The beauty of this recipe is its flexibility. And if you come up with a variation that blows your mind, please come back and tell me about it in the comments. I love hearing how people make recipes their own.
Go ahead, give yourself permission to have your cake and eat it too—no baking required. You deserve a snack that celebrates you, even on a Tuesday night at 10 PM.
Frequently Asked Questions
Can I use a different nut butter?
Absolutely. Cashew butter, peanut butter, or sunflower seed butter all work well. Just keep in mind that peanut butter has a stronger flavor, so the birthday cake taste will be less pronounced. Sunflower seed butter may cause the balls to turn slightly green over time, but they are still safe to eat.
How long do these protein balls last at room temperature?
They can sit out for up to 2 hours safely, but I recommend keeping them refrigerated for the best texture and freshness. If you are taking them on a road trip or picnic, pack them in a cooler bag with an ice pack.
Can I make these without protein powder?
Yes, but the texture will change significantly. Replace the protein powder with an equal amount of oat flour or almond flour. You may need to adjust the wet ingredients slightly to get the right consistency. The protein content will be lower, but they will still taste great.
My dough is too dry. What should I do?
Add a teaspoon of water or almond milk at a time and mix well until the dough comes together. If it still feels dry, add another tablespoon of almond butter. Different protein powders absorb moisture differently, so do not be afraid to adjust as you go.
Can I freeze these protein balls?
Yes, they freeze beautifully. Roll them into balls first, then freeze them on a baking sheet for 1 hour before transferring to a freezer bag. They will keep for up to three months. Thaw in the fridge overnight or at room temperature for 15 minutes before eating.
Pin This Recipe!
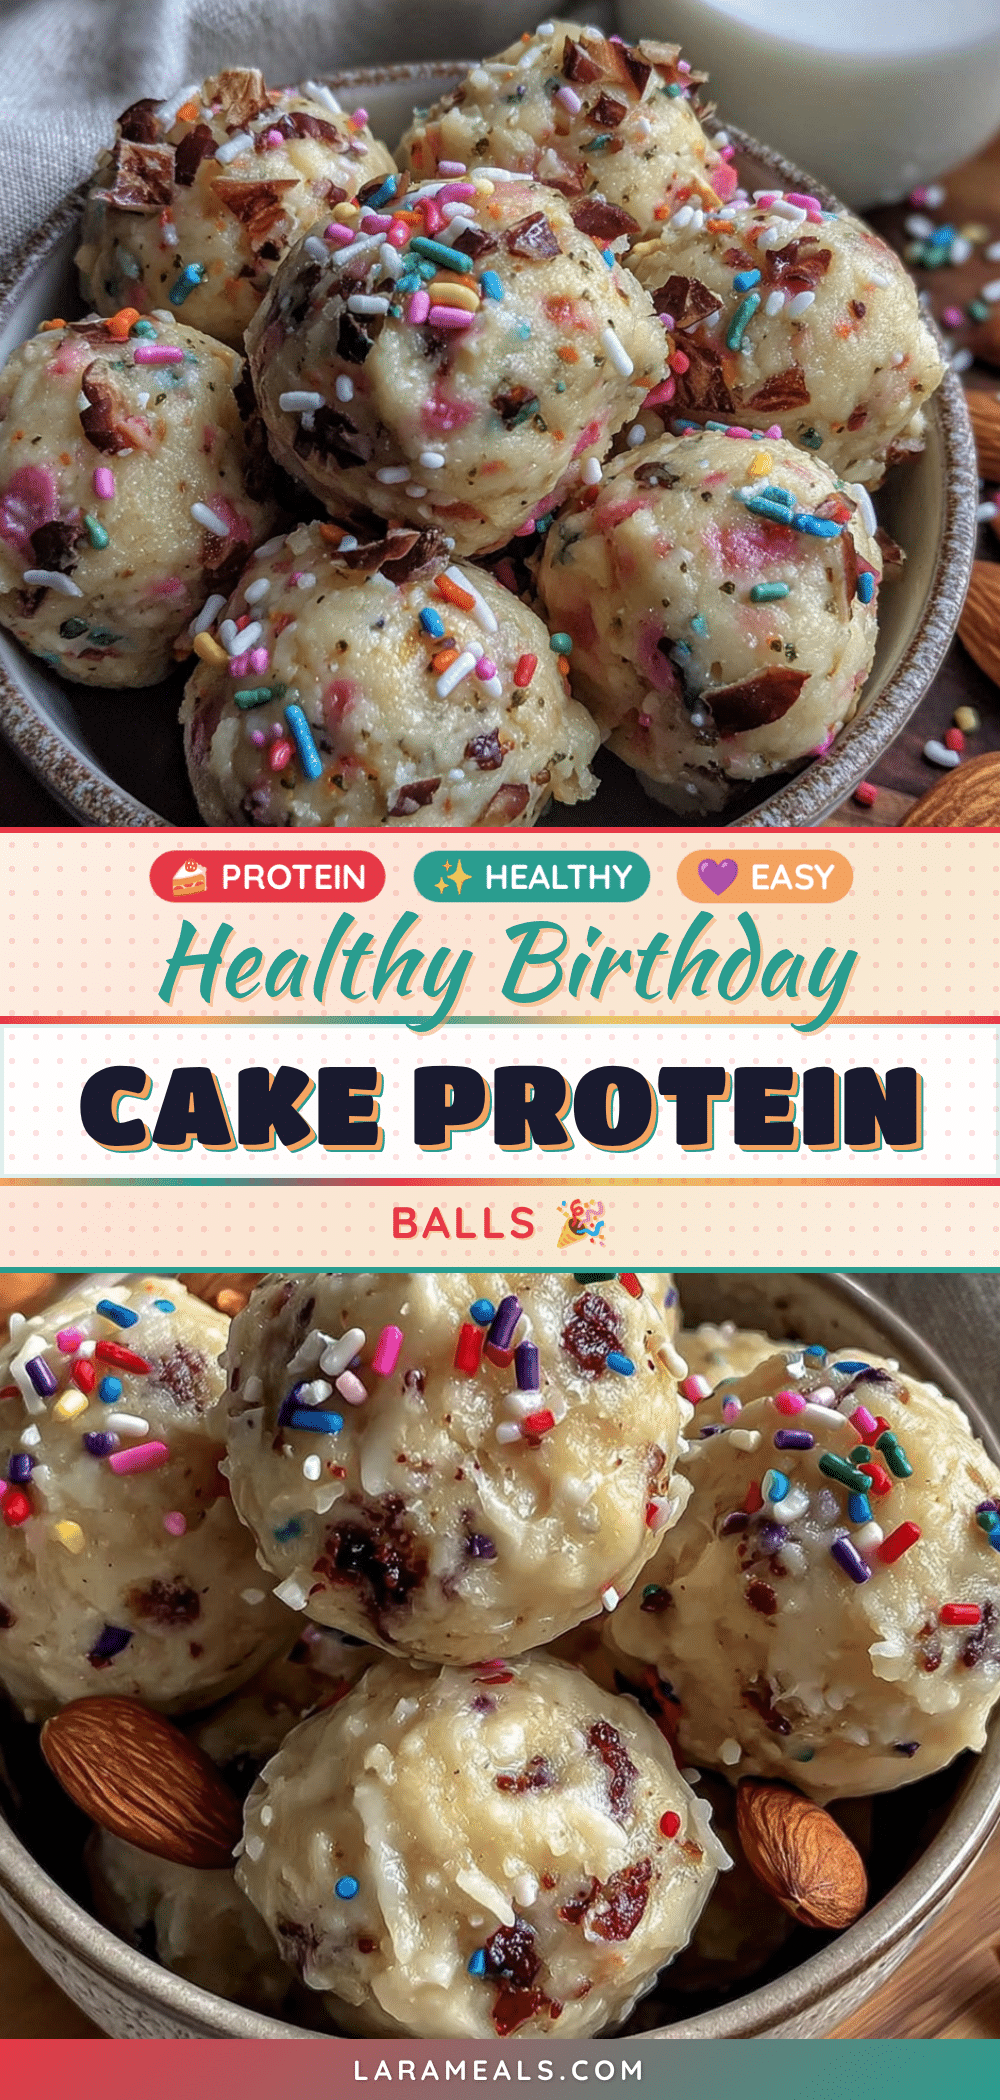
Healthy Birthday Cake Protein Balls Recipe: Easy No-Bake Snack
These healthy birthday cake protein balls are a quick, no-bake snack that tastes like a party in your mouth. Packed with protein, fiber, and good fats, they are perfect for meal prep and a guilt-free treat.
- Prep Time: 15 minutes
- Cook Time: 0 minutes
- Total Time: 45 minutes (includes chilling)
- Yield: 14-16 balls 1x
- Category: Snack
- Cuisine: American
Ingredients
- 1 cup (90g) rolled oats
- 1/2 cup (50g) vanilla protein powder
- 1/2 cup (120g) almond butter
- 3 tablespoons (45ml) maple syrup
- 2 tablespoons (15g) coconut flour
- 1 teaspoon vanilla extract
- 3 tablespoons rainbow sprinkles
- 1/4 teaspoon salt
- 2 tablespoons white chocolate chips (optional)
Instructions
- Mix the dry ingredients: In a large mixing bowl, combine the rolled oats, vanilla protein powder, coconut flour, and salt. Stir with a spatula until evenly distributed.
- Add the wet ingredients: Pour in the almond butter, maple syrup, and vanilla extract. Stir until a thick dough forms. If too dry, add a teaspoon of water; if too sticky, add more oats or coconut flour.
- Fold in the sprinkles: Gently fold in the rainbow sprinkles (and white chocolate chips if using) until just distributed.
- Chill the dough (optional): If the dough is too soft, refrigerate for 10-15 minutes.
- Roll into balls: Scoop about 1 tablespoon of dough and roll into smooth balls. Place on a parchment-lined baking sheet. You should get 14-16 balls.
- Chill to set: Refrigerate for at least 30 minutes until firm.
- Store and enjoy: Transfer to an airtight container. Refrigerate for up to 2 weeks or freeze for up to 3 months.
Notes
Use room temperature almond butter for easier mixing. Do not overmix sprinkles to avoid color bleeding. Wet hands with water if dough sticks. These taste better the next day after flavors meld.
Nutrition
- Serving Size: 1 ball
- Calories: 95
- Sugar: 5
- Sodium: 50
- Fat: 4.5
- Saturated Fat: 0.5
- Carbohydrates: 10
- Fiber: 2
- Protein: 5
Keywords: protein balls, birthday cake, no-bake, healthy snack, gluten-free, meal prep