Love this? Save it for later!
Share the inspiration with your friends
Introduction
That morning, I found myself squinting at a patch of wild yellow blooms scattered across the backyard. The sun was just warming up the earth, and the air carried that unmistakable scent of spring awakening. I’d never thought much about dandelions before—they were just those stubborn weeds ruining the lawn. But this time, curiosity nudged me. What if those bright yellow flowers could do more than just brighten the grass? Honestly, I was skeptical. Jelly from dandelions? It sounded like an odd joke from a gardening friend.
Still, a pinch of boredom and a dash of adventurous spirit led me to gather handfuls of those sunny petals. There was something oddly satisfying about picking each flower carefully, avoiding the bitter greens. Back in the kitchen, the familiar whistle of the kettle and the subtle hum of spring filtered through the window. I followed a simple recipe to coax out that floral sweetness into a golden jelly. The first spoonful was a quiet surprise—light, floral, with a hint of honeyed sunshine that felt like spring captured in a jar.
That jar of fresh homemade dandelion jelly has since become a small ritual in my kitchen, reminding me that sometimes the best flavors come from the things you never expected. It’s not just jelly—it’s a moment of calm, a taste of the season, and a little celebration of nature’s overlooked gifts.
Why You’ll Love This Recipe
Making fresh homemade dandelion jelly isn’t just about capturing a unique, springtime flavor—there’s a lot more to it that will make you want to try it again and again:
- Quick & Easy: This jelly comes together in just a couple of hours, perfect for those afternoons when you want a satisfying project without the fuss.
- Simple Ingredients: You’ll mostly work with dandelion petals, sugar, and lemon juice—no exotic or hard-to-find items required.
- Perfect for Spring: Nothing says fresh spring quite like a jar of golden jelly made from the season’s first blooms.
- Crowd-Pleaser: Friends and family always get curious—and impressed—when I pull out a jar of this unique jelly at brunch.
- Unbelievably Delicious: The floral notes balance with citrus brightness and a subtle sweetness, making it far from your average jelly.
This recipe stands apart because it embraces that delicate floral flavor without overpowering sweetness. The method of gently simmering the petals to extract their essence is what really brings the magic. Plus, it’s a gentle reminder that some of the best ingredients are right outside your door. Honestly, this jelly has become my go-to for adding a little charm to toast or a dollop on mini lemon blueberry cheesecakes—trust me, it’s a combo that feels like spring in every bite.
What Ingredients You Will Need
This recipe uses simple, wholesome ingredients that combine to highlight the gentle flavor of dandelion petals. Most are pantry staples, and the dandelions themselves are free if you have access to a clean, pesticide-free area to harvest.
- Dandelion petals: about 4 cups loosely packed (pick only the yellow petals, avoid the green parts as they can be bitter)
- Water: 4 cups (to steep the petals and extract their flavor)
- Granulated sugar: 4 cups (adjustable depending on your preferred sweetness)
- Lemon juice: ¼ cup fresh (adds brightness and helps with setting the jelly)
- Liquid pectin: 1 package (helps the jelly set properly—choose a trusted brand like Sure-Jell)
- Butter: 1 tablespoon (optional, helps reduce foaming during cooking)
When picking dandelions, I always make sure they are from an area free of herbicides or traffic pollution. For the best flavor, fresh petals harvested in late morning after the dew dries are ideal. If you want to experiment, try substituting half the sugar with honey for a more floral sweetness, though the texture might vary slightly.
Equipment Needed
- Large saucepan: for simmering the petals and extracting flavor
- Fine mesh strainer or cheesecloth: essential for straining the petals out cleanly
- Measuring cups and spoons: for accurate ingredient amounts
- Large mixing bowl: to collect the strained liquid
- Wooden spoon or heatproof spatula: for stirring the jelly mixture
- Sterilized glass jars with lids: for storing the jelly (I prefer wide-mouth jars for easy scooping)
- Candy thermometer (optional): useful if you want to check the jelly’s setting point
If you don’t have a candy thermometer, don’t worry—just keep an eye on the jelly’s consistency during cooking. For jar sterilization, I usually boil the jars and lids or run them through a dishwasher cycle right before filling. A budget-friendly alternative to cheesecloth is using a clean cotton kitchen towel, although it might take a bit longer to strain.
Preparation Method
- Harvest and prep the petals: Pick about 4 cups of fresh dandelion petals, making sure to leave the green parts behind. Rinse them gently in cold water to remove any dirt or tiny bugs. Drain well. (Time: 15 minutes)
- Steep the petals: Place the petals in a large saucepan, add 4 cups of water, and bring to a gentle boil. Reduce heat and simmer uncovered for about 20 minutes until the petals lose their bright yellow color and the water turns a golden hue. This step extracts that subtle floral flavor. (Time: 25 minutes)
- Strain the liquid: Pour the mixture through a fine mesh strainer or cheesecloth into a large bowl. Press gently to get all the liquid out but don’t squeeze too hard to avoid bitterness. Discard the petals. (Time: 10 minutes)
- Measure the liquid: You should have about 4 cups of dandelion-infused liquid. If you have less, add a little water to reach 4 cups.
- Prepare the jelly: Return the liquid to the saucepan. Stir in the lemon juice and butter (if using). Bring to a boil over medium-high heat. Add the sugar all at once and stir to dissolve. Return to a full boil and boil hard for 1 minute, stirring constantly.
- Add pectin: Stir in the liquid pectin. Boil for another minute, stirring constantly. You’ll notice the mixture thickens as it cooks. (Time: 10 minutes)
- Test the jelly: To check if the jelly is ready, drop a small amount on a cold plate. Let it sit for a minute, then push it with your finger. If it wrinkles and holds shape, it’s set. If not, boil a bit longer and test again.
- Jar the jelly: Pour the hot jelly into sterilized jars, leaving about ¼ inch headspace. Wipe rims clean and seal with lids. Let them cool at room temperature. Once cooled, refrigerate or process in a hot water bath for shelf storage. (Time: 20 minutes)
During boiling, foam may form on the surface—skimming it off improves clarity. I learned that the hard way; last time I skipped it, my jelly looked cloudy. Also, stirring constantly prevents burning on the bottom. You’ll notice the jelly’s scent shift from floral to a rich, citrusy aroma—that’s your cue it’s almost done.
Cooking Tips & Techniques
Here are some tips I picked up after a few batches of dandelion jelly:
- Pick petals carefully: Only the yellow parts, no greens. The green bits bring bitterness, and you don’t want that in your jelly.
- Steeping time matters: Too short, and the flavor won’t develop; too long, and it can turn bitter. Twenty minutes hits the sweet spot.
- Use fresh lemon juice: Bottled lemon juice can work but fresh adds a bright, natural acidity that really lifts the jelly.
- Skim foam: During boiling, foam forms. Skimming it makes your jelly clearer and prettier in jars.
- Test for set: Don’t rush to jar before testing the jelly on a cold plate; it saves you from a runny mess.
- Multitask while boiling: While the jelly cooks, sterilize jars or tidy up the kitchen to save time.
- Be patient: Let the jelly cool completely before judging its final consistency—it firms up as it cools.
Honestly, the first time I made this jelly, I was nervous about the setting process. I almost gave up when it seemed too runny, but a few extra minutes of boiling did the trick. Don’t get discouraged if your first batch isn’t perfect—practice makes perfect with jelly making!
Variations & Adaptations
If you want to tailor this fresh homemade dandelion jelly, here are some ideas:
- Herbal Infusion: Add a teaspoon of fresh mint or lemon balm leaves during the steeping phase for a refreshing twist.
- Honey Sweetened: Replace half the sugar with honey for a more floral and less processed sweetness. Keep in mind it may slightly alter the jelly’s set.
- Low-Sugar Version: Use low-sugar pectin designed for reduced-sugar jams, and reduce sugar accordingly to suit your diet.
- Seasonal Fruit Blend: Stir in fresh raspberries or chopped strawberries just before canning for a mixed-flavor jelly.
- Allergen-Friendly: This recipe is naturally gluten-free and dairy-free, but always check your pectin brand for any cross-contamination.
I once tried blending dandelion jelly with a batch of strawberry jam to create a marbled effect—it looked beautiful and tasted like a garden party in a jar. For a different texture, you might try other homemade preserves from the site, which use similar techniques but different fruits.
Serving & Storage Suggestions
Serve your fresh homemade dandelion jelly chilled or at room temperature. It pairs wonderfully with crusty bread, warm biscuits, or as a bright topping on creamy cheeses. I love spreading it lightly on toast for a delicate spring breakfast or using it alongside a platter of fresh fruit and nuts for afternoon tea.
Storage is straightforward: keep the jelly in sealed jars in the refrigerator for up to 3 weeks. For longer shelf life, process jars in a boiling water bath for 10 minutes and store in a cool, dark place for up to a year. Reheat gently to soften before serving if it firms too much in the fridge.
The flavors mellow and blend over time, so if you can wait a week or two, you’ll notice a deeper, more harmonious taste. This jelly also makes a thoughtful homemade gift, especially when paired with some fresh-baked scones or even a batch of mini lemon blueberry cheesecakes.
Nutritional Information & Benefits
A 1-tablespoon serving of dandelion jelly contains roughly 50 calories, mostly from natural sugars. It’s low in fat and protein but offers a delightful way to enjoy natural floral flavors without preservatives or artificial additives.
Dandelions themselves are rich in antioxidants, vitamins A and C, and have been traditionally used for digestive health. While the jelly is a sweet treat, it carries a bit of that natural goodness, especially since it’s made fresh without heavy processing.
This recipe is naturally gluten-free and can be adapted to lower sugar for those watching their carb intake. Just watch the pectin type and sugar replacement to keep your jelly setting properly.
Conclusion
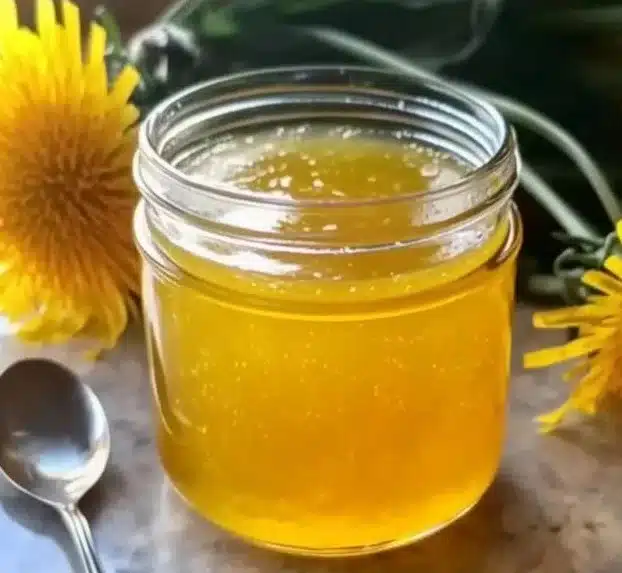
Fresh homemade dandelion jelly is one of those rare recipes that surprises you with how simple and special it feels. It’s not just a spread—it’s a little jar of spring sunshine captured on your kitchen counter. Whether you’re looking to try something new or want a charming gift from your garden, this jelly fits the bill.
Give yourself the freedom to tweak the sweetness, try new herbal notes, or even blend it with seasonal fruits. I keep coming back to this recipe because it reminds me to slow down, notice the little things, and enjoy a taste that’s genuinely unique.
So, go on—gather those golden petals and create your own batch of bright spring flavors. I’d love to hear how your jelly turns out or any creative spins you put on it. Happy jamming!
FAQs
Can I use dandelions from my lawn for this jelly?
Only if you’re certain the area hasn’t been treated with pesticides, herbicides, or chemicals. Otherwise, it’s safer to forage from clean, wild areas.
How do I know when the jelly is set properly?
Use the cold plate test: drop some jelly on a cold plate, let it sit for a minute, then push it lightly. If it wrinkles and holds shape, it’s ready.
Can I freeze dandelion jelly?
Yes, jelly freezes well. Use freezer-safe containers and leave some headspace for expansion. Thaw in the fridge before use.
What can I substitute for liquid pectin?
You can try powdered pectin, but follow the package instructions carefully as amounts and timing differ. Some recipes also use natural pectin-rich fruits like apples, but that changes the flavor.
Is fresh homemade dandelion jelly safe for everyone?
Generally yes, but if you have allergies to plants in the daisy family or certain pollen sensitivities, proceed with caution. Consult a doctor if unsure.
Pin This Recipe!
Fresh Homemade Dandelion Jelly
A simple and delightful jelly made from fresh dandelion petals, capturing the bright floral flavors of spring in a golden, sweet spread.
- Prep Time: 15 minutes
- Cook Time: 55 minutes
- Total Time: 1 hour 10 minutes
- Yield: About 4 half-pint jars 1x
- Category: Preserves
- Cuisine: American
Ingredients
- 4 cups loosely packed dandelion petals (yellow parts only, avoid green)
- 4 cups water
- 4 cups granulated sugar (adjustable to taste)
- 1/4 cup fresh lemon juice
- 1 package liquid pectin (e.g., Sure-Jell)
- 1 tablespoon butter (optional, to reduce foaming)
Instructions
- Pick about 4 cups of fresh dandelion petals, avoiding green parts. Rinse gently in cold water and drain well. (Prep time: 15 minutes)
- Place petals in a large saucepan, add 4 cups water, bring to a gentle boil, then simmer uncovered for about 20 minutes until petals lose color and water turns golden. (Cook time: 25 minutes)
- Strain the mixture through a fine mesh strainer or cheesecloth into a large bowl, pressing gently to extract liquid. Discard petals. (Time: 10 minutes)
- Measure the liquid; add water if needed to make 4 cups.
- Return liquid to saucepan, stir in lemon juice and butter if using. Bring to a boil over medium-high heat.
- Add sugar all at once, stir to dissolve, return to a full boil and boil hard for 1 minute, stirring constantly.
- Stir in liquid pectin, boil for another minute, stirring constantly. The mixture will thicken. (Time: 10 minutes)
- Test jelly by dropping a small amount on a cold plate; if it wrinkles and holds shape after a minute, it is set. If not, boil longer and test again.
- Pour hot jelly into sterilized jars leaving 1/4 inch headspace. Wipe rims clean, seal with lids, and let cool at room temperature. Refrigerate or process in a hot water bath for shelf storage. (Time: 20 minutes)
Notes
Skim foam during boiling to improve clarity. Stir constantly to prevent burning. Use fresh lemon juice for best flavor. Test jelly set with cold plate method before jarring. Let jelly cool completely to firm up. For longer storage, process jars in a boiling water bath for 10 minutes.
Nutrition
- Serving Size: 1 tablespoon
- Calories: 50
- Sugar: 13
- Carbohydrates: 13
Keywords: dandelion jelly, homemade jelly, spring recipe, floral jelly, natural preserves, easy jelly recipe


